SOCIAL MEDIA

Sunday, 16 July 2017

Happy Birthday Thinlit

Hello Crafty Friends,

Hope you have had a great day. I have spent the morning crafting and blogging, so mine has been a productive one.  Today's card was the last card I made today, had no plan or sketch in my mind - just colours.


I have a pile of Powder Pink card stock so decided to use some for the card base. I also embossed a strip with the Sweetheart Embossing Folder. 

The card front uses the Post Script background stamp, inked in Powder Pink on Whisper White card. 
 
The Circles were cut using the Layering Circles Thinlits. The black and white circles are Perfect Days Memories and More cards. Another circle was cut from Sahara Sand and used to back the Happy Birthday Thinlit which was cut from Powder Pink card.


A layer of Black & White Bakers Twine was wrapped over the embossed strip and the die cut shapes and Thinlits were adhered over the top using tombow.

Hope you get time in your crafty space today, until next time

Monday, 5 June 2017

Happy Birthday Gorgeous - JAI #362

Hello Crafty Friends

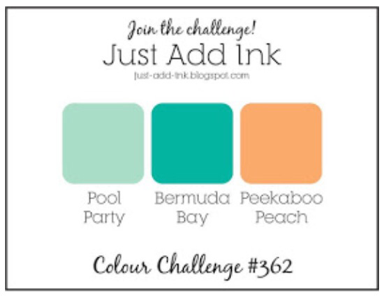
I am doing it again....entering another challenge! It was no where as hard as I thought it was going to be, although I did not enter my photo very well I did manage to link everything properly, Yay! And, I got a special mention for my entry, not too mention some lovely comments. Today's card is for another Just Add Ink Challenge #362


This weeks challenge is a colour combination - Pool Party, Bermuda Bay and Peakaboo Peach. I'm not a big user of Peakaboo Peach unless I am sponging so was a tad intimidated having to incorporate it with two of my favourite blues to make a card.

http://just-add-ink.blogspot.com.au/2017/06/just-add-ink-362colour.html 
 
 
The Happy Birthday Thinlit is an easy go to for any birthday card. So this was a good starting point for me when thinking about what to create for this card.


The Bermuda Bay card front was stamped using small sentiments from the Tabs for Everything set, with Versamark and then heat embossed with clear embossing powder.
 
The Happy Birthday Thinlit was then used three times, once to cut the Bermuda Bay card front that had just been heat embossed, and once each in Peakaboo Peach and Pool Party card stock. Put the Pool Party die back into its hole and then layer the Peach and Bermuda over the top, adhering with Tombow.
 
Behind the die cut space I used strips of Pool Party ribbon to provide a bit of texture as it looked odd just plain. 


The Floral images from Birthday Blooms was stamped in Archival Black ink and coloured using Bermuda Bay for leaves and Peakaboo Peach for the flowers. The larger image that these pieces were fussy cut from can be used for another project.

The sentiment "forever young" and the border, both from the Happy Birthday Gorgeous stamp set, was stamped in black and heat embossed with clear powder and adhered with foam strips. I placed a few Peakaboo Peach enamel dots in the corners for a little bit of extra Pop of that colour. 

Do you like my new photo background? Its two large tiles I picked up from a job site we worked on recently. 

Until next time, stay crafty
 
 
Sunday, 21 May 2017

Happy Birthday Thinlit

Hello Hello Crafty Friends
 
Had a very busy weekend here as the weather for this time of year in Perth has been gorgeous. This extends the amount of time I spend outside my crafting studio....but you cannot complain about that. Sunny and warm days with delightful evenings minus the bugs lol
 
I did manage to quickly whip up one card as I couldn't resist trying the new Happy Birthday Thinlit teamed with the Detailed Floral Thinlit.


I adore black and pink together, and thought this simple colour combo would look striking with these two die cuts. The Happy Birthday Thinlit was die cut twice, once in Powder Pink and then again in Black card stock. I stacked the two by using tombow glue sparingly.
 
To break up the two different dies I added a delicate doily and a two little die cut flowers made using the Jar of Love bundle.
 
As you can see in the picture below, I have treated the die cut to some fine tip glue pen. This makes it glossy and helps catch the eye, so the viewer is drawn first and foremost to the happy birthday enabling the background to be a little more subtle.


Again, such an easy card to make and especially fast if you don't bother with the glossy effect on the die cuts. The Happy Birthday Thinlit allows for fast and easy birthday cards production, and the font and size of the image is just the perfect size to use stand alone or with the co-ordinating stamps and/or other dies.
 
The Happy Birthday Gorgeous bundle includes the Happy Birthday Thinlit and co-ordinating stamps. The stamp set has beautiful fonts, two step floral images and lovely sentiments that can also be used individually or with the Happy Birthday Thinlit.
 
Looking forward to making many more birthday celebration cards with this amazing Thinlit and sharing them with you. Till next time, happy crafting x