SOCIAL MEDIA

Sunday 29 April 2018

ESAD 2018 Retirement List Blog Hop

Hello Crafty Friends,

Welcome to the ESAD 2018 Retirement List Blog Hop. You are currently visiting Jackie Aitken in Perth, Western Australia. You may have arrived here all the way from Tasmania, having just visited my super talented friend, Bronwyn Eastley. I hope you are enjoying all the inspiring creations so far. Be sure to follow the hop all the way through as there 28 talented Demonstrators participating.


This Blog Hop is dedicated to the Stampin' Up! products that are on the 2018 Retirement List. With the new Annual Catalogue on its way in June, now is the time a lot of Demonstrators look at relocating retired items, whether that's to a new home or somewhere else in their crafty spaces. I personally haven't sold any of my stamp sets but know there will come a time where I will have to, purely due to space. One stamp set I shall never part with is my beloved Birthday Blooms.  I decided to give "her" one last ink up before she joins the others on the retirement shelf.

My first card contains a couple of retiring products: my beloved Diagonal Stripe background stamp, Birthday Blooms and my favourite sentiment from the Colour Me Happy Stamp set. The stamped Diagonal panel has been coloured using blends in a rainbow spectrum.


My second card is a very CAS card that has been created with a Sweet Sugar Plum Card Base. Sweet Sugar Plum is my favourite retiring In Colour. Wish she made the revamp, but I am excited for the new purple tones - Gorgeous Grape and Highland Heather.


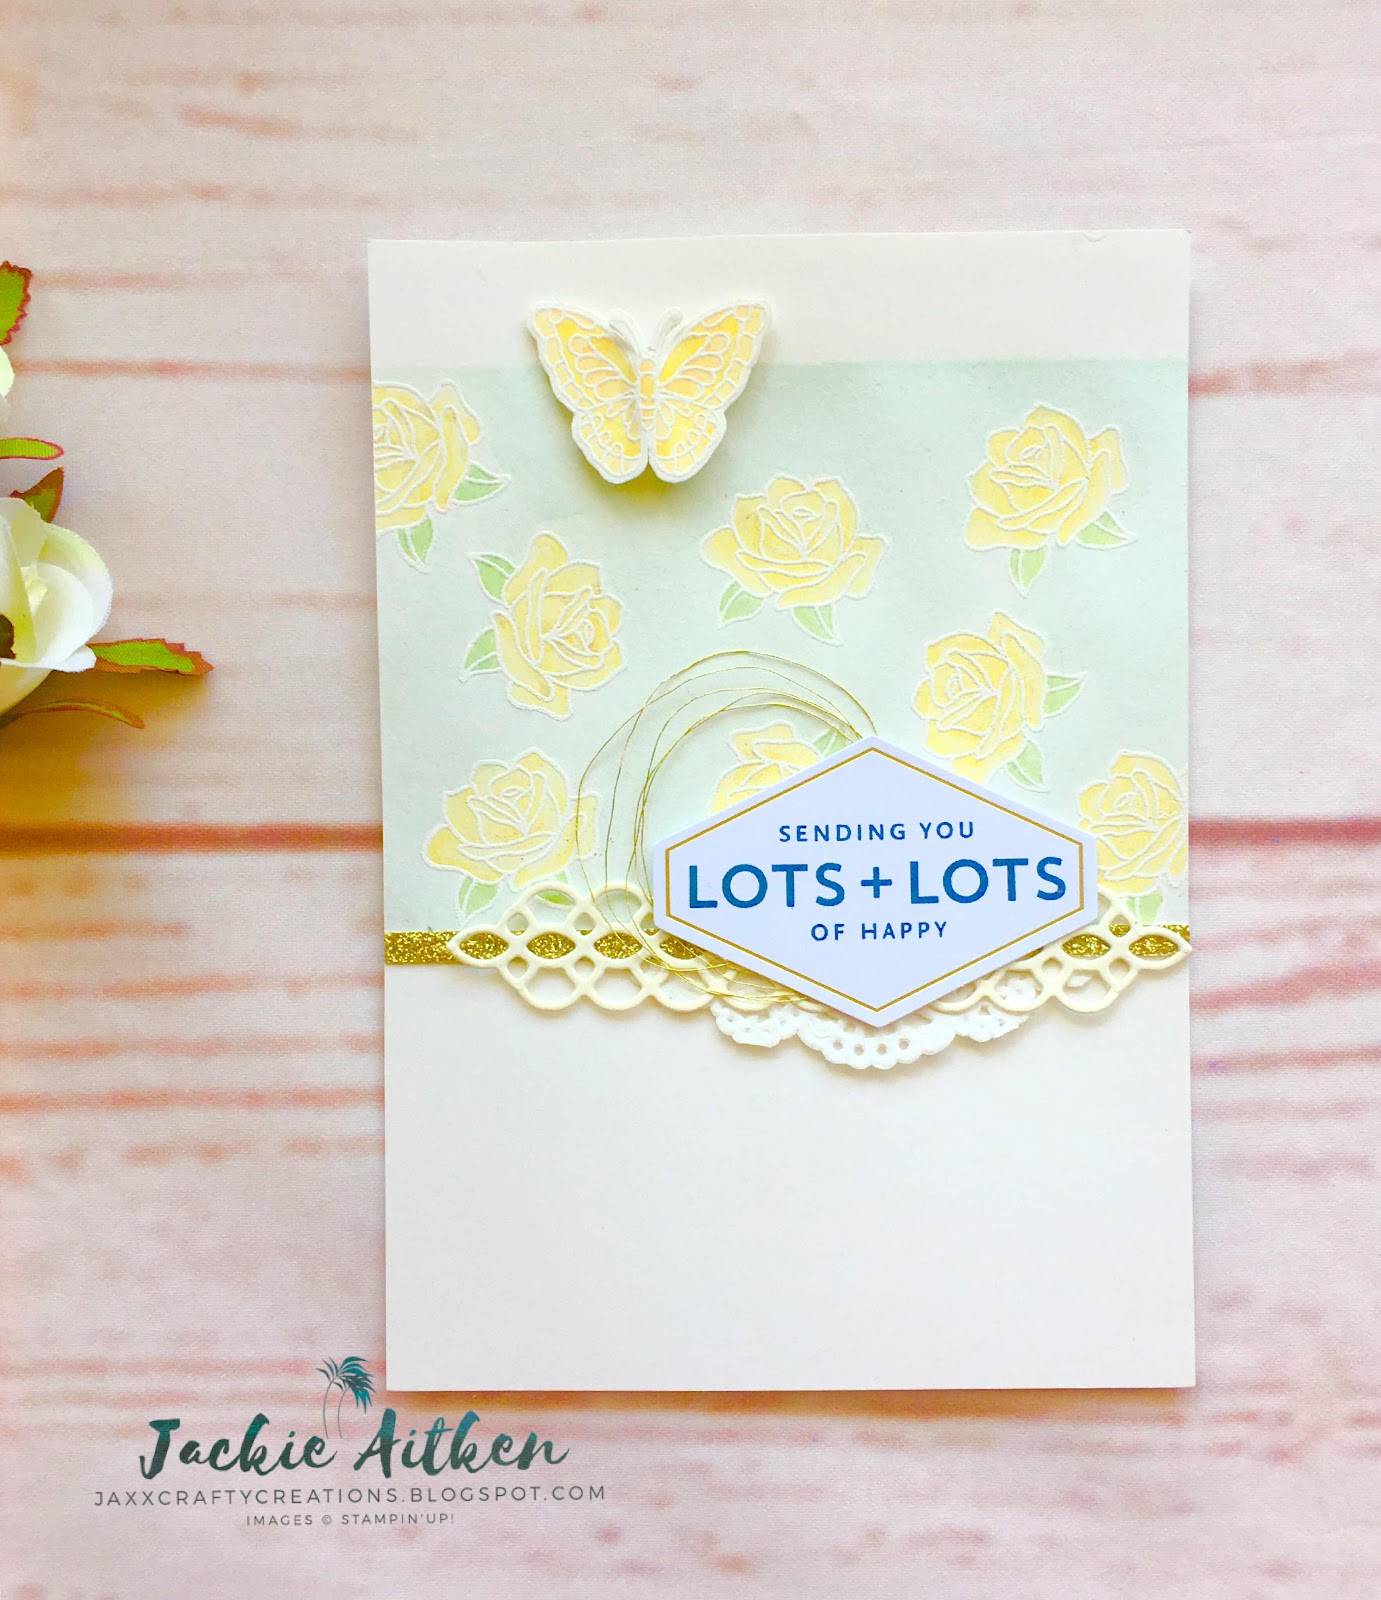
My third card has a water coloured background and also uses the Birthday Blooms stamp set and Colour Me Happy sentiment.

And my final card is one of my favourite style of cards, a Pocket Card. This one mixes old with new. The Blueberry Bushel DSP and Binder Clip look amazing against the Lemon Lime Twist, and what better way to retire my beloved Stamp Set than to surround her with brand new goodies. (The In Colour DSP Pack will be available June 1st - I was lucky enough to receive it as part of my secret squirrel box for Onstage Display Stamper)
With the insert showing 


Thank You for stopping by today. We appreciate and value your time. Like our posts? Feel free to follow the Blog and/or leave comments.

A participant list has been provided at the end of each blog, just in case you lose your way. Up next in the Blog Hop is my fellow Just Add Ink Design Team Member,  Jo Stubbings.  Enjoy x
https://jostubbings.blogspot.com.au/2018/04/esad-2018-retirement-list-blog-hop.html
Blog Hop Participant List
4. Jackie Aitken            You are here


Until next time, stay crafty
Looking for fun, fancy fold cards with tutorials....Look no further. Click on the image below to browse what is available in the AddINKtive Designs Tutorial Shop.

http://addinktivedesigns.com/shop/


Thursday 26 April 2018

Just Add Ink Challenge #406 - Sketch

Good Day Crafty Friends,
 
Hope you are having a fabulous day. Mine has been a productive one, not too much crafting unfortunately. You know all those chores that you mean to get done when you have a spare minute, I did them all today lol - repotting plants, replacing corroded security lights, gate latches and the letterbox -  the joys of living close to the Ocean.
 
I did manage to squeeze in enough time during my day to complete a card for this weeks Just Add Ink challenge - Just Add A Sketch.
https://just-add-ink.blogspot.com/2018/04/just-add-ink-406sketch.html
I find Sketches can be hit or miss for me. Sometimes they come easily and others not so much so. The card I created using this weeks challenge sketch falls into the later category. This sketch sat on my desk for weeks. Every time I looked at it all I could conjure was the basic shapes on a piece of cardstock. But you know what, sometimes that's all you need to do.
 
I have a few basic strips and shapes I keep with my colour coach. When I get in a bit of a bind I pull them all out and just fiddle. Here is the result:


I have mixed a few new items with some older stuff. The striped Lemon Lime Twist panel is a Sale-a-bration Card from the Tutti Frutti Pack. A Perfect Days Memories & More card, the kind you use for journaling/writing on, has been die cut using the Stitched Shapes Framelits and then shadowed with a Flirty Flamingo circle. A few Flirty Flamingo enamel shapes and Silver Metallic Thread were also added.

The Whisper White Background has been embossed with the new Subtle Embossing Folder. I am so glad I got given this Embossing Folder in my box of Onstage goodies. I probably would have overlooked it for other, more prominent, folders. The other new item is the little silver leaves trinket embellishments.


I am thrilled the Cake Soiree Bundle is carrying over into the new catalogue, as that little flower die and the floral stamps are my favies. I almost always team the flower with the foliage from Jar of Love.
 
The Design Team have created some stunning cards using this sketch, be sure to check them out here. Why not join us and play along. Enter your card into the gallery on the Just Add Ink Blog Page or by clicking here.
 
Until next time, stay crafty


Wednesday 25 April 2018

Colour INKspiration Challenge #32

Good Day Crafty Friends,

Hope you are having a fabulous day. Welcome to the Colour INKspiration Challenge Blog Hop. You are visiting Jackie Aitken, in Western Australia. If you are following the Hop, you may have arrived here from my lovely and super talented friend, Nicole Wilson. Wasn't her creation just stunning! Be sure to follow the Hop all the way through, the Design Team have created some absolute beauties to inspire your creativity.


This weeks, colour combo is simply YUM! Night of Navy, White, Gold and Pink Pirouette. Actually, anything with Pink Pirouette, in my mind, is always YUMMY.
 

I love all these colours individually. Normally colours I like by themselves do not make fabulous combinations. However, don’t you think this one is a stunner! 
 
My card today uses a few new products from the new Annual Catalogue which are not available until 1st of June - The Subtle Embossing Folder, Darling Label Punch, Pearlized Doilies, the ever so sweet Share What You Love Artisan Pearls and the gorgeous Polka Dot Tulle Ribbon.


The new Subtle Embossing Folder is just that, very subtle. I really like it. Perfect for CAS cards that need that teeny bit of texture without being overbearing. It has an almost linen appearance, and looks lovely teamed with wooden elements such as the Wood Textures DSP.
 
The Pearlized Doillies have two different finishes on each side - one is pearlized, the other white. I have used the white side as it looked better with the ribbon.
  
I fiddle with my card layouts until I am happy.  When using a central focal point such as a cluster of elements, try adjusting the position for totally different looks eg lower right, centre, top right.
 
I often work backwards lol Let Me Explain - I start with the card front elements first and work my way back in layers. Often the card base and bottom matt layers are the last thing decided upon.
 
When working with lots of fiddly die cuts,  I use a piece of Press n Seal and place it over the top of my layout. I then flip it over, adhere glue to the backs of the die cuts, flip it back over and press in place, the die cuts stick to your card and the Press n Seal just peels away.

INKspired to join the challenge? It's so easy. Firstly, get some INKspiration by hopping around to see what all of the Colour INKspiration Crew have to show you. Then you have 12 days from today to make and upload your creation to the Facebook Colour INKspiration Group. You don't have to have a blog to participate but if you do you can link back to your post. Make sure you use all of the challenge colours. You can also use neutrals such as white, black, Sahara Sand, Crumb Cake and Metallics. Not a member of the Facebook group yet? Just click here and ask to join Colour INKspiration, add the group to your favourites and share it with your crafty friends so they can join in the fun too. We can't wait to see what you create with these gorgeous colours.

 Next up in the Blog Hop is my beautiful and creative friend, Lou Kitzelman in tropical Nambour, Queensland. Enjoy!


https://withabowontopbylou.blogspot.com/2018/04/colour-inkspiration-challenge-32-blog-hop.html


Thanks so much for stopping by today, until next time


Tuesday 24 April 2018

Lilypad Lake Shadow Box Card - AddINKtive Designs

Good Day Crafty Friends,

It’s time to share this month’s creation for the AddINKtive Designs Team. I am so excited about this fancy fold card as I absolutely adore it!  Bronwyn has been extremely busy creating loads of new tutorials, all fancy folds and some with multiple interactive components in the one card! 

http://addinktivedesigns.com/shop/
 

The PDF tutorials have detailed step by step instructions with clear photographs. All cards in the Tutorial Shop are designed using Stampin' Up! products and fold flat for posting. Check out all the amazingly detailed fun fancy folds over at AddINKtive Designs here.


Today’s card is one of the Shadow Box Cards I created for my Onstage Display Board Samples. It uses the new stamp set, Lilypad Lake. I absolutely love how easy these Shadow Box cards are to make. They also fold well, making them perfect for posting.

I have added an acetate window to this version. Before adhering the acetate to the inside, a few die cut “foliage” pieces were adhered first. 

The inside back panel was masked and sponged. Shimmery White Card Stock is my go to for sponging and water colouring.  Daffodil Delight, Peakaboo Peach and Flirty Flamingo Inks were used to create the sunset. Pool Party Card Stock was stamped with Soft Sky Ink using the water stamp from High Tide.   This was used to create the bottom portion of the back panel and the insert in front of the birds.


The Herons were stamped and coloured using Stampin Blends, with the reverse image technique used to create the bird on the right. I like to use the Stampin’ Up! Silicone Craft Sheet to reverse the image of the stamps. Simply stamp a nice clear image directly onto the sheet, take a piece of Card and press onto the image. When you lift your card the image will be in reverse.

To finish the card I added the Lilypad's, which were stamped in Memento Tuxedo Black ink and coloured using Stampin' Blends. It seriously was a very simple and fast card to create. 

I have started another version of this Shadow Box Card using another new stamp from the soon to be released Annual Catalogue. As soon as I saw this Stamp Set I knew I wanted to use it in this fun Fold. I will share that one very soon. In the meantime, don’t forget to check out the AddINKtive Designs Tutorial Shop for loads of Fancy Fold Cards, that have been designed using all Stampin’ Up! Products. 

Until next time, stay crafty

https://www3.stampinup.com/ECWeb/default.aspx?dbwsdemoid=4014891http://www.stampinup.net/esuite/home/jackieaitken/jointhefun


Wednesday 18 April 2018

Display Board Stamper Blog Hop - Sea of Textures, Lilypad Lake, Painted Glass

Hello Crafty Friends,

Welcome to the Onstage April 2018 Presenter & Display Board Showcase Blog Hop. Thanks for joining us.


You are currently visiting Jackie Aitken in Western Australia.  If you are following the hop, you may have arrived here from talented, Kim Oliver. There are quite a few Demonstrators from all over the globe participating in this hop, so be sure to hop all the way through, for loads of inspiration using some of the new products from the new Annual Catalogue.

I was lucky enough to be a Display Board Stamper at my second ever Onstage, in Perth, Western Australia. I was so nervous I couldn't hang my samples, so my wonderful Upline, Sarah Klass, stepped in and hung them for me while I received Check In training. Below is a picture of my Display Board.


My generous box of goodies contained three stamp sets: Sea of Textures, Painted Glass and Lilypad Lake. The new Subtle Embossing Folder and the Lovely Label punch were in there too. I also received the new in colour DSP and matching embellishments, which was so exciting to see, but so hard to keep the excitement to yourself lol.
Below are the samples I created for my Display Board. WARNING: Lots of photographs to follow, so I will keep the chit chat to a minimum.
SEA OF TEXTURES STAMP SET

Sampler - Netting made with Linen Thread
sea of textures, stampin up, sampler

Fancy Fold - Shadow Box Card with Acetate Window. On opening and closing the sailing boats move.
stampin up sea of textures, waterfront, fancy fold, shadow box acetate window

Shaker card with a sponged card front.
sea of textures, stampin up, shaker card, rainbow sponging

Shaker Card, sponged background, silver heat embossed images and White Sand.
sea of textures, stampin up, shaker card, vellum and heat embossing

Another Shaker Card - the new adhesive backed sequins are stunning.
sea of textures, rainbow sponging, stampin up, shaker card

Stamped background, sponged side panel with vellum "bubbles".
sea of textures, stampin up, octopus card

Two Original Fancy Folds Designs - Shadow Box Card & Aquarium Box Card.
stampin up, waterfront, sea of textures, fancy fold, window cards, aquarium card

LILYPAD LAKE STAMP SET

Another Shadow Box card with acetate window. Sponged background and reverse stamped images.
lilypad lake, stampin up, shadow box card, fancy fold, sponging technique

Sponged panel with stamped images coloured using Stampin' Blends.
lilypad lake, stampin up, sponging technique

The sailing boats are so cute, I had to make a nautical themed card, complete with a life buoy.
lilypad lake, stampin up, nautical card, blueberry bushel dsp


PAINTED GLASS STAMP SET


A 12 x 12 Scrapbook Page Layout

Again, some white heat embossed images that have been water coloured. The butterfly has been fussy cut and adhered with mini dimensionals.
painted glass stamp set, stampin up, roses and butterfly cards, watercolour
The roses on this card are also white heat embossed, on Vellum. Colour has been applied to the back with Stampin Blends.
painted glass, stampin up, roses, coloured vellum, stampin up

Also in my box was the Lovely Label Punch. I have sponged a piece of Shimmery White card stock, used a portion to create the panel on the left and the remainder, was punched and used as a base for the roses.
painted glass, stampin up

Another Shadow Box Card with the Gold Foil exterior embossed using the new Subtle Embossing Folder. The Medallion image has been Gold heat embossed and portions of the stamped image, fussy cut and layered.
painted gkass, stampin up, subtle embossing folder, shadow box card

For those that are familiar with my work, will know I struggle to use DSP. I tried incorporating the stunning In Colour DSP pack I received with the cards I was creating, but it just wasn't working.  Then, I had a light bulb moment. I love making Pocket Cards, so what better way to show the DSP.
The next few creations feature the new In Colour DSP Pack & Binder Clips along with products that are carrying over into the new Catalogue.

Pineapple Punch
stampin up, pineapple punch, pocket card, cake soiree
inside
stampin up, pineapple punch, pocket card, jar of love, cake soiree
Lovely Lipstick
stampin up, lovely lipstick dsp, pocket card
inside
stampin up, lovely lipstick, pocket card
Call Me Clover
pocket card, call me clover dsp, berry burst. stampin up
inside
stampin up, call me clover, celebrate you thinlits, berry burst, pocket card

That's it folks!! I can hear you sighing lol I know - I'm a sharer!

Next up in the blog hop is my lovely and talented friend, Nicole Wilson. I was lucky enough to share the board with Nicole, so can vouch for how stunning her creations are in real life. Enjoy xx

 https://nicolejuliewilson.blogspot.com/2018/04/onstage-april-2018-presentation-display.html

Thank You so much for hopping with us today, your time to view our projects is greatly appreciated.


Interested in some of the Fancy Fold cards featured in today's post? Tutorials are available!! Just click on the image below to be taken to the AddINKtive Designs Tutorial Shop.