SOCIAL MEDIA

Monday, 5 February 2018

Party Panda's

Good Day Crafty Friends,

Its a gloriously sunny day in my craft studio today, a sign that it is too hot to go outside, unless its in the pool under shade lol  So, whats a crafty gal to do......craft of course!

I was quite excited about getting into the studio today as I had a few more new stamp sets that needed to be shown ink for the first time. The Sale-a-bration Party Panda's was one of these sets.


I made a few quick and easy cards to start off. As the Panda does not require a lot colouring, these cards were so fast to construct, the timely part would be fussy cutting the Panda.

Both cards use Perfect Days Memories and More cards. The buffalo check DSP is now retired, I had a few card front pieces left over and wanted to use them up.


This card also uses a few Perfect Days Memories and More cards, tilted on the card front. The Guitar image is from another Sale-a-bration set - Epic Celebrations.

WOW FACTOR 3D & FANCY FOLD TUTORIALS


Until next time, stay crafty


Saturday, 3 February 2018

Woodland Friends - We Must Celebrate

Hello Crafty Friends,

Hope you are having a great day. I have a two cards to share today. Both use the We Must Celebrate stamp set - I love these little woodland creature images.

I have used two different colouring mediums - the first card uses the Stampin' Blends and the second Water Colour Pencils.
 
Perfect Days Memories & More cards were used to provide the angled layers behind the coloured stamped panel. I have also used a set of Paper Roses Rectangular Stitched Dies for these cards. These are not a Stampin' Up product.


This next card uses the smaller images in the stamp set to create a background. I chose the acorn, branch and mushrooms. The images were stamped in Crumb Cake ink and coloured with Water Colour Pencils.
 
 
As you can tell this card was created to wish friends a Happy New Years. These adorable critters would also make gorgeous baby cards and décor pieces for a children's room. I am currently working on another 3D project with these cute images, stay tuned for its reveal. In the meantime, you can check out the box card I made a few weeks ago with this stamp set here.
 
Until next time, stay crafty
 
 
Wednesday, 10 January 2018

Colour INKspiration #25 - Apron of Love


Hello Crafty Friends,
Welcome to another year of Colour INKspiration challenges and the Colour INKspiration #25 Blog Hop. You are visiting Jackie Aitken, in Western Australia, and have possibly arrived from visiting the lovely and super creative, Lou Kitzelman in stunning Nambour, Queensland. Wasn't Lou's creation absolutely stunning!

To start off the New Year, we have a fresh and vibrant colour combination for you - Lemon Lime Twist, Night of Navy and Whisper White.
Image may contain: plant, drink and nature
I chose to make a Mother's Day card using this fabulous colour combination along with the new Apron of Love Bundle. As I am gifting a small piece of jewellery,  I decided to make a "Card with Gift Box". This style of card cannot be posted, but it can be kept and put on display after the gift has been opened.
stampin up, apron of love, gift box card

The card base has two sides with the reverse perfect to write your personal message. The front is for decorating. And of course the box comes off the card and has a lid.


I started with a large Perfect Days Memories & More card, cut down and adhered to the card base. The Apron and front of the gift box have been created using a small Perfect Days Memories & More card. 

stampin up, apron of love, gift box card

The Oven Glove, Rolling Pin, Cupcakes and Apron front have been white heat embossed onto Night of Navy & Lemon Lime Twist card. The Mum sentiment has been fussy cut and adhered with Tombow.

stampin up, Apron of Love, https://jaxxcraftycreations.blogspot.com

Silver Foil card was used to create the baking tray and the cooking utensils. All the sentiments are from the Apron of Love stamp set. The cupcakes were created using the Lift Me Up Stamp set and matching dies.

I finished the card by adhering a small silver foil gift bow to the top of the gift box. I hope you are inspired to give this kind of card a go. It is easier than it looks and the fun part is in the decorating.

Next up in the blog hop is the amazingly talented Denita Wright-Smee and her gorgeous creation. Enjoy x

https://denitawright.blogspot.com/2018/01/colour-inkspiration-ci25.html

Thanks for stopping by today, until next time, stay crafty


Wednesday, 4 October 2017

GDP #107 - Thanks using Hello Friend

Good Day Crafty Friends,

Hope your day is going well. Yay, made it to hump day, only a few more days and it's the weekend!!!!! School Holidays can be chaotic times - routines go out the door, the house is a mess, sleep ins occur, meaning everyone fends for themselves at breakfast and lunch time. All of which equates to less crafting time.

I did however manage to whip up a card for this weeks Global Design Project #107. The theme is Grateful. It's also a timely challenge for me, as I have a few Thank You cards I need to make and send out.

http://www.global-design-project.com/2017/10/global-design-project-107-theme.html

I have used a few layers to create this card and totally love it. I started by creating the Wood background, inking the Wood Grain Background stamp in Sahara Sand onto Whisper White card. A layer of vellum was laid over the top and then sewen with a basic stitch. Natural twine was wrapped around four times and then these layers were adhered to a Sahara Sand card base with dimensionals.
 

The next two layers are cards from the Memories & More Perfect Days pack - both matted using Sahara Sand and Softy Sky. The wreath from Hello Friend was white heat embossed on Sahara Sand card. The flowers have been stamped in Softy Sky. The wreath and flowers were fussy cut and adhered using dimensionals over a vellum scalloped circle. The Layering Circles Framelits were used to create the vellum scalloped circle.
 

A natural twine bow was added at the top of the wreath with a thanks tag tucked underneath the wreath so the sentiment dangles below. The Sentiment from In The City was cut down from a longer greeting.


The design team over at Global Design Project have created some wonderful 'Grateful' themed cards. Be sure to check them out along with all the stunning participants entries. Or join us all and play along.
 
Until next time, stay crafty


Thursday, 14 September 2017

Global Design Project #104 - Case the Designer

Good Day Crafty Friends,

Hope you are having a fantastic day. Its been hectic crazy in my neck of the woods of late. With this being my daughters final year at high school we have been busy with Year 12 stuff like balls and graduation preparations.

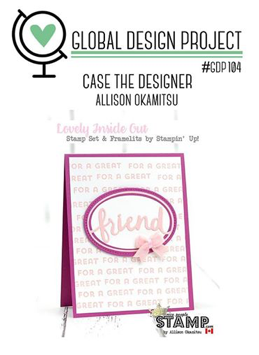
I have finally caught up on things (for now lol) and have had a chance to create a card to enter into this weeks Global Design Challenge!! Wahoooo! This weeks challenge is case the designer with a stunning creation by Allison Okamitsu.

http://www.global-design-project.com/2017/09/global-design-project-104-case-designer.html
 
I don't have the Lovely Inside and Out bundle...yet, it's on my list for October! So this required me to put my dazzling pink brainstorming hat on and think outside the square. I love the repetitive stamped background Allison has created so decided to start there. I used the sentiment from the hostess set In The City, inked in Powder Pink on whisper white card.


I also chose to give my card a similar layout to Allison's substituting the die cut word with a cheeky looking Toucan on a Swing! 
 
The Toucan and Floral images from the Good Vibes stamp set have been water coloured and fussy cut. The circle was cut using the Layering Circles Framelits. A panel of Whisper White card was sponged in Flirty Flamingo, Daffodil Delight and Tempting Turquoise, splattered with water using a paint brush and placed behind the card front cut out. 


I snipped the tips off the ends of a toothpick and secured some Black & White Bakers Twine for the swing.  A rhinestone jewel was added to the Toucan's head flower and a greeting from the Perfect Days Memories & More card pack was adhered with dimensionals.

EDITED 21/9/2017 - My card was selected as a Winner!!!
Wahoooooooooooooo!
 

Until next time, stay crafty


Sunday, 16 July 2017

Happy Birthday Thinlit

Hello Crafty Friends,

Hope you have had a great day. I have spent the morning crafting and blogging, so mine has been a productive one.  Today's card was the last card I made today, had no plan or sketch in my mind - just colours.


I have a pile of Powder Pink card stock so decided to use some for the card base. I also embossed a strip with the Sweetheart Embossing Folder. 

The card front uses the Post Script background stamp, inked in Powder Pink on Whisper White card. 
 
The Circles were cut using the Layering Circles Thinlits. The black and white circles are Perfect Days Memories and More cards. Another circle was cut from Sahara Sand and used to back the Happy Birthday Thinlit which was cut from Powder Pink card.


A layer of Black & White Bakers Twine was wrapped over the embossed strip and the die cut shapes and Thinlits were adhered over the top using tombow.

Hope you get time in your crafty space today, until next time

Tuesday, 11 July 2017

Good Vibes Stamp Set

Good Day Crafty Friends

I adore the two large image stamps from the Good Vibes stamp set. They are extremely easy to colour using Stampin'Up! Water colour pencils 


The card front is a Perfect Days Memories & More large sized card and is attached to a Sweet SugarPlum card base. The large Good Vibes stamp was inked in Archival Black and coloured using an Aqua Painter & Water Colour Pencils. To finish it off a few die cut leaves, in Lemon Lime Twist and Pool Party were tucked behind the stamped panel and a few rhinestone jewels to a few flowers.


This card uses the same card base and stamp set - SweetSugar Plum and Good Vibes.  The large image stamp was inked in Archival Black on Shimmery White card and coloured using Water Colour Pencils. 

The water coloured panel was then attached to layer of Pool Party card. The background Die from the Eclectic Layers Thinlits was cut on Sweet SugarPlum and backed with Pool Party card before adhering all panels to the card base


I have shared this card in a previous post - Pool Party Card Base, Memories and More Card Pack for the card front. Hey You image stamped in Archival Black onto Shimmery White card and coloured using Water Colour Pencils.
 
Until next time, stay crafty x
Saturday, 8 July 2017

Just Add Ink #367

Hello Crafty Friends

Today's card was super quick and easy to make thanks to the Perfect Days Memories & More card pack. This pack has been so amazingly versatile, I have made a lot of cards, some gift tags, and have used them to decorate projects by cutting shapes and using just like DSP.


My card's colour combination has been inspired by this weeks Just Add Ink Challenge #367. The only colour I really didn't apply in either ink or card was crumb cake, however the bakers twine and small wooden asterisk embellishment are both close to Crumb Cake.

If you would like to join us and play along, please click on the picture below and the link will take to the Just Add Ink blog, where you can add your creation and browse the inspiration provided by the Design Team.
 
http://just-add-ink.blogspot.com.au/2017/07/just-add-ink-367colour.html
Starting with a Lemon Lime Twist card base,  to this I attached a layer of Smoky Slate that has been embossed with the new Sweetheart embossing folder. Two layers of Bakers Twine were wrapped around the card base before applying the layers listed in the next step.
 
I have used three small cards from the Perfect Days Card Pack. One cut using the layering circle framelits, and a plain journaling card with grid lines was placed behind the Lemon Lime Twist speech bubble card. The  Hello sentiment from the Hello Friends stamp set was inked in Momento Black and stamped directly onto the Memories & More card.


I tried the "friend" stamp underneath the hello but preferred it without and decided to add a small wooden embellishment to the right hand side instead.

There are two of every card in these Memories and More packs so I was able to whip up two of these in a matter of minutes. Thinking I may have to order one of the other packs.....but which one?

Until next time, stay crafty x


Monday, 3 July 2017

Floral Statements

Greetings Crafty Friends

I have some super exciting news to share today, but first a card.


The Floral Statements stamp set includes two large image stamps. Two different sentiments - Hello and Thank You.

For this card I have used the large Thanks stamp with a large card from the Perfect Days Memories and More card pack.


The image was stamped in Archival Black ink onto Shimmery White card stock so the flowers could be water coloured. The left hand side edge was fussy cut and adhered to Tempting Turquoise card stock. A thin strip of card stock was layered underneath the Bakers Twine. To finish it off I added some rhinestone jewels. 

And now for my super exciting news....

I have been asked to be a Design Team Member for the new Joy of Sets Challenge Blog! It's going to be so much fun with fortnightly challenges that enable players to use both current and retired Stampin'Up! Products.
We would love for you to join in the fun too. The Facebook group has some great inspiration for retired and current stamp sets. To join The Joy of Sets Facebook group, request here.
 
The challenge blog is an extension to the Facebook group page with fortnightly challenges and the chance to be a guest designer.
 
Please join us for the very first blog challenge which goes live 4th July. 


Until tomorrow, stay crafty 
Sunday, 2 July 2017

Falling Flowers GDP#093

Hello Crafty Friends

Our team had a gathering recently which included a shoe box swap. I totally love these fun events, I always walk away inspired and with a handful of cards. I got to play with a bundle I totally missed in last year's catalogue - but alas, thank the stamp fairies, the Falling Flowers bundle has been carried over into this year Annual Catalogue! 

My BBB (Big Brown Box) arrived this week with lots of exciting goodies from the new Annual Catalogue. (insert happy dance) Two sets that got inked up first were the Falling Flowers and Good Vibes stamp sets.

 
I adore the colour combination that is this weeks Global Design Project challenge #093. Berry Burst and Lemon Lime Twist look amazing together, such a striking contrast. Check out all the amazing creations using these colours here. 

http://www.global-design-project.com/2017/06/global-design-project-093-colour.html 
 
With loads of offcuts left over from making a few cards using the Naturally Eclectic card stock pack, I thought this GDP challenge was the perfect opportunity to use these scraps up, just having to swap out the Soft Sky for Pool Party. Cut strips of varying thicknesses and adhere randomly to make a colourful band.


The images from the Falling Flowers stamp set were inked in Archival Black and coloured using Stampin'Up! water colour pencils. The Flowers were die cut using the coordinating Framelits and adhered to Whisper Whisper card. The Pool Party, Berry Burst and Lemon Lime Twist band was adhered to the lower half of a thick Whisper White card base, then the stamped Floral image layer was attached using dimensionals. The sentiment from Birthday Delivery stamp set was heat embossed in white on black card stock.


The second card has a Berry Burst card base, then a large card from the Perfect Days Memories & More card pack.  The Good Vibes stamp was inked in Archival Black and coloured using water colour pencils with an aqua painter. To finish it off, two die cut leaves using the Framelit from the Naturally Eclectic Die set were cut in Pool Party and Lemon Lime Twist card and placed behind the stamped image.

We have the first of Perth's winter weather today, so its the perfect day to stay indoors and craft. With loads of birthdays in July, I have a busy day ahead. Until next time, stay crafty x


Tuesday, 27 June 2017

Hey You! JAI #365

Good Day Crafty Friends

The courier delivered my BBB (Big Brown Box) today so I got to ink up lots of new goodies from the Annual Catalogue. I decided to try out one of the stamp sets I have not seen a lot of samples for.  In fact, searching Pinterest only produced two pins! 


A friend recently passed a series of exams, so I wanted to combine her card with this weeks Just Add Ink Challenge. She is also a huge bird lover, and I knew exactly which stamp I was going to use. This weeks challenge over at Just Add Ink is a sketch. Check out the Design Teams inspirational cards and other entrants fabulous designs here, or click on the challenge sketch below.

http://just-add-ink.blogspot.com.au/2017/06/just-add-ink-365sketch.html 
 
The Good Vibes set has two large rubber stamps with thin black outlines - perfect for colouring. For my card the Hey You stamp was inked using Archival Black ink and coloured using Stampin'Up! water colour pencils. I have also used the new Memories & More card pack. These packs are such great value for card fronts - I will be able to make a minimum of 46 card fronts for just AUD$17-50 - say what!
 
From the Perfect Days card pack I used one of the larger cards - white with small hexagons and attached it to a  Pool Party card base. The coloured stamped image was mounted onto Pool Party card to co ordinate with the card base and adhered with dimensionals. 


The congratulations sentiment from Fabulous Flamingos was stamped in Black Momento ink onto So Saffron card. The heart was die cut in Sweet SugarPlum using the heart Thinlit from the Love Bundle (now retired). A little strip of Perfect Days Memories and More card pack was added because it was just lying on my desk left over from another project lol. Oh and last but not least, some bling in the middle of a few flowers.
 
Until next time, stay crafty x