SOCIAL MEDIA

Tuesday 27 June 2017

Hey You! JAI #365

Good Day Crafty Friends

The courier delivered my BBB (Big Brown Box) today so I got to ink up lots of new goodies from the Annual Catalogue. I decided to try out one of the stamp sets I have not seen a lot of samples for.  In fact, searching Pinterest only produced two pins! 


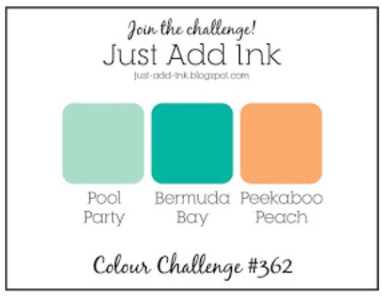
A friend recently passed a series of exams, so I wanted to combine her card with this weeks Just Add Ink Challenge. She is also a huge bird lover, and I knew exactly which stamp I was going to use. This weeks challenge over at Just Add Ink is a sketch. Check out the Design Teams inspirational cards and other entrants fabulous designs here, or click on the challenge sketch below.

http://just-add-ink.blogspot.com.au/2017/06/just-add-ink-365sketch.html 
 
The Good Vibes set has two large rubber stamps with thin black outlines - perfect for colouring. For my card the Hey You stamp was inked using Archival Black ink and coloured using Stampin'Up! water colour pencils. I have also used the new Memories & More card pack. These packs are such great value for card fronts - I will be able to make a minimum of 46 card fronts for just AUD$17-50 - say what!
 
From the Perfect Days card pack I used one of the larger cards - white with small hexagons and attached it to a  Pool Party card base. The coloured stamped image was mounted onto Pool Party card to co ordinate with the card base and adhered with dimensionals. 


The congratulations sentiment from Fabulous Flamingos was stamped in Black Momento ink onto So Saffron card. The heart was die cut in Sweet SugarPlum using the heart Thinlit from the Love Bundle (now retired). A little strip of Perfect Days Memories and More card pack was added because it was just lying on my desk left over from another project lol. Oh and last but not least, some bling in the middle of a few flowers.
 
Until next time, stay crafty x


Tuesday 20 June 2017

Happy Birthday Gorgeous - Friend

Hello Hello Crafty Friends

The wonderful thing about having a craft studio is being able to create a handmade card that is individually personalised with the recipient in mind.

I have an absolutely wonderful friend (who I met through Stampin'Up!) that drives over an hour away to craft with me. She lives up in the big smoke - Perth,  and I down in the sleepy beachside suburbs. 

Every time she visits she brings gifts - magnetic A4 sheets for my Dies - a true Crafty friend who understands my pain at not being able to purchase locally. We had a team show box swap recently and she made us all a neat little treat box. She also made the most beautiful gift bag for me for some die cuts I had requested. I suspect my lovely friend has been watching tutorials by the talented Sam Hammond - Pootles, UK SU Demo lol


When I sat down at my crafting counter I saw Sharon's cute gift bag and it made me think of how wonderfully generous and thoughtful she is, I knew I wanted to die cut the word friend on the card front.

Using Shimmery White Card Stock, I sponged Daffodil Delight, Lemon Lime Twist, Bermuda Bay & Pacific Point. After the ink was dry I applied the images from the Happy Birthday Gorgeous stamp set with Versamark and white embossing powder.

I took some letter Dies and taped them together on the back side before running them with the sponged card front through the Big Shot.

The die cut card front was mounted to a layer of basic black card with foam strips for extra height. The sentiment is from the Paisley & Posies Bundle and was white heat embossed on Lemon Lime card backed with basic black. This was adhered to the card front with dimensionals. 
 
Until next time, stay crafty

Monday 19 June 2017

Jar of Blooms - JAI#364

Hello Crafty Friends

I have had a wonderful week off, during which time we celebrated our youngest fur baby and Hubby's birthdays. We were blessed with the most amazing weather for this time of year in Perth and enjoyed every minute soaking up the winter sun.


I was excited to get back into my crafty space today. This is not hubby's card, but a card I made for the Just Add Ink Challenge #364 Click the link or picture below to play along with the challenge or to check out the other entries.

http://just-add-ink.blogspot.com.au/2017/06/just-add-ink-364inspiration.html 

Wow wee this was an all round hard one for me as I kept wanting to use the new supplies that I had just ordered - but these goodies, including my new embossing paste, wouldn't be here until next week. 

So I just made do with the things I already have in my ever growing craft stash.


I started with a Smoky Slate card front. To this I Stitched some vellum that had been embossed with the brick wall Embossing Folder and underneath that layer I slipped a small piece of Whisper White that had been stamped in Smokey Slate ink with the hardwood background stamp.

The Jar was cut from Silver Foil cardstock using the Jar of Love Framelits. Using a scrunched up piece of paper I tapped it into Versamark and then randomly onto the Jar and heat embossed in gold. 


The flowers from Happy Birthday Gorgeous and leaves from Remarkable You stamp sets, were white heat embossed on Whisper White card stock. Then using sponge daubers with Daffodil Delight & Lemon Lime Twist inks to colour.

The little Lemon Lime Twist strip of card stock was heat embossed in gold using the Bless Your Heart sentiment from Jar of Love. Finally to add a teeny weeny bit of copper I threw in the copper ribbon bow.

Before I depart to the mess that was my tidy craft room before entering this morning, I wanted to share my news


Wahooooo! Last weeks entry won!! I was so blown away, I did a happy dance all around the house lol

Till next time, stay crafty  x
Tuesday 13 June 2017

Dragonfly Anniversary Wishes - JAI#363

Hello Crafty Friends

Who doesn't love dragonflies? I especially love them darting and dancing over our pool, its mesmerising. Plus, their presence in a Perth summer is a very welcome sight as they help maintain the mosquito population. 


I have a few friends who have milestone anniversaries coming up, so was quite chuffed when I saw this weeks Just Add Ink challenge #363  - Anniversary. My card entry in last weeks challenge got a special mention along with some lovely comments from the Just Add Ink Design Team!!!

http://just-add-ink.blogspot.com.au/2017/06/just-add-ink-363anniversary.html 

To a Sahara Sand card base I added a layer of Berry Burst. The Whisper White card front was stamped using the blossoms from the Colourful Season stamp set, inked in Berry Burst.

Using a piece of Shimmery White card, I sponged Berry Burst and then flicked water using a paintbrush. This was then cut using the largest oval die from the Stitched shapes Framelits and adhered over the stamped blossoms using tombow.


The dragonfly die cut was heat embossed in gold THREE times! It's so stunning in real life and very sturdy- almost like a wooden embellishment! I laid this on top of the oval and also heat embossed the sentiment from Teeny Tiny Words stamp set on black card stock.

Some gold metallic thread was added under the sentiment before adhering to the card front and a few gold tone jewels were applied.


These dragonflies are in the mail and making their way to a special set of friends who a celebrating a fabulous milestone this coming weekend.

Until next time, stay crafty


Tuesday 6 June 2017

Bright Wishes

Hello & Welcome

If you are a first time visitor, hello from Perth, Australia. If you are revisiting, giddaye crafty friends. I have a quick post to share today as I have a date with my computer - see below.

The Bright Wishes stamp set has one huge image of a stone water well and some lovely sentiments. The stone well reminds me of the wishing well my childhood town had in its main centre. It was surrounded by lovely manicured gardens and I was always intrigued with the dazzling coins when they caught the suns light.


The Well was stamped in Archival Black and coloured using Stampin' Up! Water Colour Pencils, which made for uber fast colouring. This was fussy cut and then adhered to the card front, as I stuffed up the background that I originally had. The card front is Shimmery White card stock that was sponged in Berry Burst ink and then splattered with water, using an aqua painter and the corner of an acrylic block. 

The sentiment was heat embossed in white powder on black card stock and was adhered to the card front over the bottom of the dragonfly die that had been cut in Melon Mambo card stock.
 
Its a smokey day here in Perth ( preventative fires performed during our winter) which isn't great for anything outside even though its a lovely day, so I am heading off to work on a blog revamp, new colours, a logo (ohhh sounds flash lol) not so girly and wishy-washy. Seeing as I am teaching myself its a long slow process - wish me luck.
 
Until next time, stay crafty


Cut out to be friends - Crafting Forever

Good Day from sunny Perth

Today's card was made with a fellow crafter in mind. It uses the sentiment and images from the Crafting Forever stamp set, available now from the new Annual Catalogue.


I stared by heat embossing the scissor images on different coloured card stock - Flirty Flamingo, Daffodil Delightful, Wisteria Wonder and Pool Party. They were then fussy cut and adhered to a Whisper White card front that had a diamond shaped removed using the Layering Squares Thinlits. 

On Smoky Slate card stock, white heat emboss the sentiment in the spot the white card front reveals.  Attach the card front to the Smoky Slate layer using foam strips for height and then attach to a Pink Pirouette card base.

Sorry I forgot to mention the blue pair of scissors that sits horizontally was adhered using dimensionals, just to add another layer because I like layers lol

Look at all the crafty images and crafty statement stamps the Crafting Forever set has


https://www3.stampinup.com/ECWeb/ProductDetails.aspx?productID=143958

Click on the image above or the shop icon on the side of the page to purchase yourself this crafty stamp set. A must have if you have crafty friends who would appreciate a craft inspired card.
 
Until next time, stay crafty x


Monday 5 June 2017

Happy Birthday Gorgeous - JAI #362

Hello Crafty Friends

I am doing it again....entering another challenge! It was no where as hard as I thought it was going to be, although I did not enter my photo very well I did manage to link everything properly, Yay! And, I got a special mention for my entry, not too mention some lovely comments. Today's card is for another Just Add Ink Challenge #362


This weeks challenge is a colour combination - Pool Party, Bermuda Bay and Peakaboo Peach. I'm not a big user of Peakaboo Peach unless I am sponging so was a tad intimidated having to incorporate it with two of my favourite blues to make a card.

http://just-add-ink.blogspot.com.au/2017/06/just-add-ink-362colour.html 
 
 
The Happy Birthday Thinlit is an easy go to for any birthday card. So this was a good starting point for me when thinking about what to create for this card.


The Bermuda Bay card front was stamped using small sentiments from the Tabs for Everything set, with Versamark and then heat embossed with clear embossing powder.
 
The Happy Birthday Thinlit was then used three times, once to cut the Bermuda Bay card front that had just been heat embossed, and once each in Peakaboo Peach and Pool Party card stock. Put the Pool Party die back into its hole and then layer the Peach and Bermuda over the top, adhering with Tombow.
 
Behind the die cut space I used strips of Pool Party ribbon to provide a bit of texture as it looked odd just plain. 


The Floral images from Birthday Blooms was stamped in Archival Black ink and coloured using Bermuda Bay for leaves and Peakaboo Peach for the flowers. The larger image that these pieces were fussy cut from can be used for another project.

The sentiment "forever young" and the border, both from the Happy Birthday Gorgeous stamp set, was stamped in black and heat embossed with clear powder and adhered with foam strips. I placed a few Peakaboo Peach enamel dots in the corners for a little bit of extra Pop of that colour. 

Do you like my new photo background? Its two large tiles I picked up from a job site we worked on recently. 

Until next time, stay crafty
 
 
Saturday 3 June 2017

Hello New Stampin'Up! Annual Catalogue

Wahooo! Welcome to the stunning new Stampin'Up! 2017-2018 Annual Catalogue!! Haven't seen it yet? Click here to view all the deliciousness!

I just adore the layout and vibrant look the new catalogue has. So many new and exciting products, including pages of ribbons, embossing paste, amazing kits with refill packs, a new memory keeping system and Stampin'Up!s very own planner!

Below are images of all the new suites released in the Annual Catalogue 2017-2018. If you want to have a closer look just click on the image that interests you and you will be directed to that section of the catalogue.I will share images of my favourites from all the products in a future post.

https://www3.stampinup.com/ecweb/ItemList.aspx?categoryID=301001

https://www3.stampinup.com/ECWeb/ItemList.aspx?categoryid=301002

https://www3.stampinup.com/ECWeb/ItemList.aspx?categoryid=301003 

https://www3.stampinup.com/ECWeb/ItemList.aspx?categoryid=301004 

https://www3.stampinup.com/ECWeb/ItemList.aspx?categoryid=301005 

https://www3.stampinup.com/ECWeb/ItemList.aspx?categoryid=301006 

https://www3.stampinup.com/ECWeb/ItemList.aspx?categoryid=301007 

https://www3.stampinup.com/ECWeb/ItemList.aspx?categoryid=301008 

https://www3.stampinup.com/ECWeb/ItemList.aspx?categoryid=301009 

https://www3.stampinup.com/ECWeb/ItemList.aspx?categoryid=301010 

https://www3.stampinup.com/ECWeb/ItemList.aspx?categoryid=301011 

https://www3.stampinup.com/ECWeb/ItemList.aspx?categoryid=301012 

https://www3.stampinup.com/ECWeb/ItemList.aspx?categoryid=301013 

https://www3.stampinup.com/ECWeb/ItemList.aspx?categoryid=301014 

https://www3.stampinup.com/ECWeb/ItemList.aspx?categoryid=301015 

Aren't they amazing!!!! And that's just the suites! Bundles and Stamps will have to be another post.

Not only has SU given us a fabulous new catalogue to browse and shop from but they have a fantastic promotion for the entire month of June! 

So if you thinking about treating yourself to a big order then June maybe the month to do - check out the We ❤️ Hosts Promo below

https://www3.stampinup.com/ECWeb/ItemList.aspx?categoryid=300000

If you do shop with me for the first time, don't forget to allow contact when you are setting up your account so I can send you a free gift. In addition, if you would like project ideas for the item you purchased then I would be more than happy to help - just email me after you receive your goodies.
 
Until next time, stay crafty x


Thursday 1 June 2017

Happy Birthday Gorgeous - You Make Me Smile

Good Day Crafty Friends

Our team of crafters had a shoe box swap recently - I love these events!!! So fun to catch up with my Stampin' Sisters, eat some yummy homemade deliciousness, make each other's cards while chatting over coffee or tea - perhaps a dance to Tina Turners Nutbush...more card making and chatting. 

We all choose a card to make and then prepare ten lots of everything required to make our chosen card. It's so much fun! Like musical chairs, we move from station to station creating ten cards of our choice from the selection team members have put together.


A fairly simple card using four colours - the new in colour Berry Burst, Sahara Sand, Powder Pink and Whisper White.
 
The floral images are from the Happy Birthday Gorgeous and Jar of Love stamp sets. The sentiment "You make me smile" is from the Colourful Seasons set.
 
The Whisper White card front was stamped using Sahara Sand ink and the little "nut" image, then a strip of Sahara Sand cardstock that was embossed with the Hexagons Embossing Folder and adhered over the top. The Whisper White circle was die cut using the Layering Circle Framelits which was added to a Scalloped edge layer in Berry Burst card stock.
 
The flowers from the Happy Birthday Gorgeous set are a two step stamp - the outside was inked using Berry Burst and the inside using Powder Pink. These were stamped and fussy cut and then adhered to the card in various places using dimensionals.
 
The little leaf under the bigger flower is from Jar of Love and was inked using Sahara Sand and die cut using the matching dies for this bundle.
 
The Whisper White card front was adhered to a layer of Berry Burst card stock and then attached to a base of Sahara Sand.
 
Until next time, stay crafty x