SOCIAL MEDIA

Sunday, 29 April 2018

ESAD 2018 Retirement List Blog Hop

Hello Crafty Friends,

Welcome to the ESAD 2018 Retirement List Blog Hop. You are currently visiting Jackie Aitken in Perth, Western Australia. You may have arrived here all the way from Tasmania, having just visited my super talented friend, Bronwyn Eastley. I hope you are enjoying all the inspiring creations so far. Be sure to follow the hop all the way through as there 28 talented Demonstrators participating.


This Blog Hop is dedicated to the Stampin' Up! products that are on the 2018 Retirement List. With the new Annual Catalogue on its way in June, now is the time a lot of Demonstrators look at relocating retired items, whether that's to a new home or somewhere else in their crafty spaces. I personally haven't sold any of my stamp sets but know there will come a time where I will have to, purely due to space. One stamp set I shall never part with is my beloved Birthday Blooms.  I decided to give "her" one last ink up before she joins the others on the retirement shelf.

My first card contains a couple of retiring products: my beloved Diagonal Stripe background stamp, Birthday Blooms and my favourite sentiment from the Colour Me Happy Stamp set. The stamped Diagonal panel has been coloured using blends in a rainbow spectrum.


My second card is a very CAS card that has been created with a Sweet Sugar Plum Card Base. Sweet Sugar Plum is my favourite retiring In Colour. Wish she made the revamp, but I am excited for the new purple tones - Gorgeous Grape and Highland Heather.


My third card has a water coloured background and also uses the Birthday Blooms stamp set and Colour Me Happy sentiment.

And my final card is one of my favourite style of cards, a Pocket Card. This one mixes old with new. The Blueberry Bushel DSP and Binder Clip look amazing against the Lemon Lime Twist, and what better way to retire my beloved Stamp Set than to surround her with brand new goodies. (The In Colour DSP Pack will be available June 1st - I was lucky enough to receive it as part of my secret squirrel box for Onstage Display Stamper)
With the insert showing 


Thank You for stopping by today. We appreciate and value your time. Like our posts? Feel free to follow the Blog and/or leave comments.

A participant list has been provided at the end of each blog, just in case you lose your way. Up next in the Blog Hop is my fellow Just Add Ink Design Team Member,  Jo Stubbings.  Enjoy x
https://jostubbings.blogspot.com.au/2018/04/esad-2018-retirement-list-blog-hop.html
Blog Hop Participant List
4. Jackie Aitken            You are here


Until next time, stay crafty
Looking for fun, fancy fold cards with tutorials....Look no further. Click on the image below to browse what is available in the AddINKtive Designs Tutorial Shop.

http://addinktivedesigns.com/shop/


Friday, 15 December 2017

Paper Adventures Team Blog Hop - Sketch

Hello Crafty Friends,


Welcome to my blog and the Paper Adventures Team Blog Hop. You are currently visiting Jackie Aitken. I am so excited about todays post. I have been invited by the delightful Kelly Kent, to join her and her team in their monthly blog hop as a Guest Designer - such an honour! Kelly is such a giving, thoughtful and caring lady, she is generous with her time, extremely helpful and so very creative. She has an equally amazing group of ladies in her team of Paper Adventurers, so I was more than delighted to join them in their final blog hop for 2017.
 
 
I am lucky enough to be on two Design Teams with Kelly. She is constantly creating and sharing. Kelly also designed this months blog hop sketch -is there anything this wonder woman cannot do! Such a wonderful sketch, I was able to produce this card with little thought process - just select stamps and colours.


Starting with a Sweet Sugar Plum card base, I added a layer of Early Espresso. The next set of layers are using the same colours with the addition of some gold foil card, cut into the three panels as detailed in the sketch.
 
The centre cluster has been mounted on another set of layered card in Sweet Sugar Plum, Early Espresso and Gold Foil. These have been cut using the Stitched Shapes Framelits - taking the largest square die and extending the cuts.
 
I have used the Hexagon Embossing Folder on the three Early Espresso Panels to provide a point of difference between the card base and the layered centre cluster.


The large floral image in the Birthday Blooms stamp set is my go to stamp for Birthdays, Congratulations and Thank You cards. I love colouring this floral bouquet either with water colour pencils, SU inks or Stampin' Blends. This one has been coloured using ink pads and an aqua painter. A light layer of Daffodil Delight was laid down first and then left to dry. Once dry I then use an extra fine paintbrush to apply darker lines of Daffodil Delight.
 
The flower was fussy cut and then adhered to gold foil, which was then fussy cut. This gives the floral image a gold border to match the layers. The pistols in the centre of the flower have been heat embossed in gold, using a paint brush to apply the Versamark.
 
To complete the sketch, a gold foil banner was tucked under the centre cluster and a gold heat embossed sentiment on Sweet Sugar Plum card was adhered with a mini dimensional.
 
Be sure to hop all the way through the Paper Adventure's Team Blog Hop, the girls have created absolutely beautiful creations to share with you. Next up in the blog hop is Kelly Kent. Enjoy xx
http://mypapercraftjourney.com/2017/12/15/paper-adventures-team-blog-hop-sketch/
Thank You for stopping by and visiting my blog today. Until next time, stay crafty
Thursday, 12 October 2017

Just Add Ink #381 - Just Choose Two

Hello Crafty Friends,

Hope you are having a fabulous day. It's challenge time over at Just Add Ink and this weeks challenge is Just Add Two! One of my favourite JAI challenges! 

https://just-add-ink.blogspot.com/2017/10/just-add-ink-381just-choose-two.html

I chose to use sequins and colouring. I love Tulle shaker cards as they are not bulky, which makes them fabulous for posting. They are also a lot less hassle to work with opposed to acetate sheets. 


The fabulous thing about Tulle Shaker cards compared to other shaker cards is the sequins are sandwiched quite tightly between the layers of Tulle. The benefit of this is that sequins are always showing even when held upright - they do not drop to the bottom. 


I have used my favourite stamp - Birthday Blooms for my colouring aspect of the card. Stamped in Archival Black ink and coloured using an Aqua Painter with Melon Mambo, Wild Wasabi and Daffodil Delight inks. The flower was fussy cut. 


The card front has been created with strips of Melon Mambo, Flirty Flamingo and Powder Pink. After adhering the strips to Whisper White card, it was embossed with the Hexagons EF. 

The Layering squares Thinlits were used to remove the centrepiece for the shaker window. On the reverse side of the card front - Tulle was added with double sided tape. Sequins were placed on top of the netting and then another layer of Tulle was adhered. To hide the mess, cover with a larger square of Whisper White before adhering to a Melon Mambo card base.
 
The sentiment from Floral Phrases was white heat embossed on black card and attached with a few mini dimensionals.
 
I loved this challenge, probably because I was creating a pink card, with colouring, two of my favourite items for a card. Be sure to check out the amazing creations the Design Team have shared using this weeks challenge. Why not join us and play along, you can submit your challenge card here.
 
Until next time, stay awesome
 
Thursday, 28 September 2017

Just Add Ink #379 Inspiration Picture

Good Day Crafty Friends,

Well, that week went uber fast! Thank goodness it's nearly the weekend. Hope we get a spot of that elusive thing they call sunshine. 

It's challenge time over at Just Add Ink! My favourite time of the week. I am supposed to play along fortnightly, but I simply adore JAI challenges and just cant help myself. I love the variety in the challenges, they are so much fun and always inspire me to create items outside my comfort zone. 

This week, the fabulously talented, Kelly Kent has chosen a stunning picture to draw inspiration from

https://just-add-ink.blogspot.com/2017/09/just-add-ink379inspiration.html

I just adore the pink and neutral tones. Plus, that jug of delishiousness makes me think of mocktails by Pool. I'm not a big drinker but give me a smoothie, frappe, glass of fruity punch and I'm a happy glamper. No I don't camp - are your crazy.....there are poisonous snakes in this country! 


I chose to take the pinks in the jug of yummyness and soft white in the tablecloth and use them in my card. My card didn't turn out how I envisioned but was happy with it as I knew the receiver loves pink and stitched cards. 

I stuffed up the card front stitching at the very end (see pic below) right hand top corner. blahhh!


It annoyed me so much I had to cover it with little glitter hearts. Then they looked ridiculous by themselves so added the Berry Burst hearts lol 


I'm really digging square cards at the moment. This one is half a 12x12 sheet of Blushing Bride for the card base. 
 
The card front has been water coloured with a light Powder Pink wash. Embossing paste and white embossing powder were applied through the medallion stencil, from the Party Patterns Decorative Mask set. I heat set the powder so the embossing paste has a lovely bright white sheen. 
 
I then attached the card front to a layer of Blushing Bride and Crumb Cake card with a zig zag stitch around the border. 
 
The Floral images from Remarkable You and Birthday Blooms were heat embossed in gold and water coloured using Powder Pink ink. The sentiment was also heat embossed in gold. A lace doiley, glimmer white card and vellum leaves, strip of glimmer white card, year of cheer embellishment and powder pink ribbon were layered using a Whisper White stitched circle as the centre piece 

Be sure to check out my fellow design team creations here, so many beautiful cards - I love all the pinks! We would love for you to join us and play along. 

Until next time, stay awesome

Thursday, 24 August 2017

Just Add Ink #374 - Inspiration


Hello Crafty Friends,

Hope you are having a fabulous day.  It's challenge time over at Just Add Ink and this week we have an Inspiration Challenge. When I saw the inspiration picture I was instantly drawn to the texture and colour. I saw all the wood textures and the white tones with slight blue hues, and the silver spoon!

http://just-add-ink.blogspot.com/2017/08/just-add-ink-374inspiration.html


My daughter loves white cards and I have made this one to go with a gift she is about to receive for her amazing achievement in Year 12 Ancient History.

 
I pulled out my favourite stamp set - Birthday Blooms, and heat embossed the large floral image on Vellum with white powder. I fussy cut the image and flipped it over and sponged some Soft Sky.


A stitched circle of whisper white was adhered to the whisper white card front then cut on the right hand edge - enough room to allow a strip of silver glimmer paper to show when adhered to the card base.


Vellum leaves were punched and adhered using tombow and a sponge, then the card front was embossed using the Wood Grain Embossing Folder (retired).


The vellum flower was attached to the circle on the card front and the congratulations sentiment from Floral Phrases - stamped in Soft Sky, was slightly curled and adhered over a nest of silver metallic thread. I added a few white sequins and then adhered the card front to the card base with silver glimmer strip on the right hand side.
 
The Design Team over at Just Add Ink have created some amazing projects for this inspiration challenge, be sure to check them out. We would love for you to join us and play along.
 
Until next time, stay awesome


Monday, 17 July 2017

Joy of Sets #002 - Music Sheet Background

Hello Crafty Friends,
 
Its challenge time over at Joy of Sets Blog Challenge. This fortnight's challenge requires participants to use a current or retired Stampin'Up! stamp set with the letter S in the stamp's title. eg Colourful Seasons, Swan Lake etc.

Today's card uses one of the new background stamps - Music Sheet. I wanted to create a soft, feminine card for a music loving lady.


The Music Sheet Background stamp was inked using Black Momento and stamped onto Whisper White card stock. This was then placed onto a layer of Powder Pink and then a layer of Whisper White before being attached to a Thick Whisper White Card base.

The Floral image from Birthday Blooms was heat embossed in silver on Shimmery White card stock, and coloured using and aqua painter with Powder Pink, Smoky Slate and Soft Sky inks. The fussy cut image was adhered to the card front with dimensionals. 

The sentiment "Best Wishes" from  the Blooms & Wishes stamp set, was white heat embossed on black card stock and then mounted to some Powder Pink and adhered with Tombow.


While I had the stamp out I made another card. The rainbow background and sentiment from Pocketful of Sunshine had me singing. I will share the details in tomorrow's post. 
 
Come join us and play along by clicking on the picture link below
   
https://joyofsetschallenge.blogspot.com.au/2017/07/jos002-letter-s.html
Cant wait to see what stamp set everyone chooses for the S letter challenge! 
 
Until next time, stay crafty


Monday, 5 June 2017

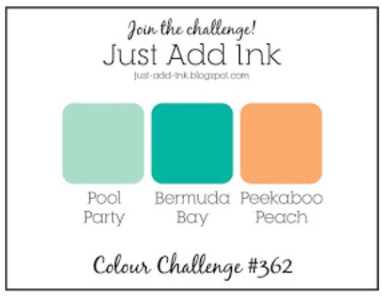
Happy Birthday Gorgeous - JAI #362

Hello Crafty Friends

I am doing it again....entering another challenge! It was no where as hard as I thought it was going to be, although I did not enter my photo very well I did manage to link everything properly, Yay! And, I got a special mention for my entry, not too mention some lovely comments. Today's card is for another Just Add Ink Challenge #362


This weeks challenge is a colour combination - Pool Party, Bermuda Bay and Peakaboo Peach. I'm not a big user of Peakaboo Peach unless I am sponging so was a tad intimidated having to incorporate it with two of my favourite blues to make a card.

http://just-add-ink.blogspot.com.au/2017/06/just-add-ink-362colour.html 
 
 
The Happy Birthday Thinlit is an easy go to for any birthday card. So this was a good starting point for me when thinking about what to create for this card.


The Bermuda Bay card front was stamped using small sentiments from the Tabs for Everything set, with Versamark and then heat embossed with clear embossing powder.
 
The Happy Birthday Thinlit was then used three times, once to cut the Bermuda Bay card front that had just been heat embossed, and once each in Peakaboo Peach and Pool Party card stock. Put the Pool Party die back into its hole and then layer the Peach and Bermuda over the top, adhering with Tombow.
 
Behind the die cut space I used strips of Pool Party ribbon to provide a bit of texture as it looked odd just plain. 


The Floral images from Birthday Blooms was stamped in Archival Black ink and coloured using Bermuda Bay for leaves and Peakaboo Peach for the flowers. The larger image that these pieces were fussy cut from can be used for another project.

The sentiment "forever young" and the border, both from the Happy Birthday Gorgeous stamp set, was stamped in black and heat embossed with clear powder and adhered with foam strips. I placed a few Peakaboo Peach enamel dots in the corners for a little bit of extra Pop of that colour. 

Do you like my new photo background? Its two large tiles I picked up from a job site we worked on recently. 

Until next time, stay crafty
 
 
Tuesday, 30 May 2017

Just Add Ink #361 - Remarkable You

Hello & Welcome Crafty Friends,   

I have decided to enter my very first blog challenge today!! Scary stuff for such a newbie - I feel nervous just talking about it. But, they say writing it down is a form of commitment, so it's done now - that means I have to follow through and enter!

Plus, the two main reasons I started a blog was to share my crafty creations, and to be able to enter challenges. Entering competitions like a blog challenge or blog hops requires you to put your creative hat on and design. Simply use the products you have at your disposal and follow the challenge guidelines to create a card.

It has been proven that creativity can be learned, through constantly creating and designing. The more you design and make your own creations the easier it becomes to be creative. Hence, why challenges and blog hops are fantastic outlets for ensuring your creativity juices are constantly flowing.

http://just-add-ink.blogspot.com.au/2017/05/just-add-ink-361just-choose-two.html
 
I have decided to enter the Just Add Ink Challenge as I have personally met a few members of the design team at the Stampin' Up! Perth convention in April this year. If you do not have a blog, JAI also accepts entries via email!! The Just Add Ink challenge this week offers a choice - you choose two from the available three concepts. Flowers-Washi Tape- Watercolour. I decided to chose water colour and flowers - surprise, surprise lol.


I started with a black card base and heat embossed the sentiment from the Colourful Seasons stamp set with gold embossing powder.

Using gold foil card stock and the Detailed Floral Thinlits, I cut the smaller of the two detailed end pieces and used this as a base for the flowers. The die cut is adhered directly to the card front using tombow. If I wasn't posting the card I possibly would have raised the die cut with dimensionals opposed to gluing directly onto the card front.


Using Shimmery White card stock I stamped the Floral images from Remarkable You & Birthday Blooms stamp sets in Versamark and heat set using gold embossing powder. The flowers were water coloured using Daffodil Delight, Peakaboo Peach, Berry Burst and Lemon Lime Twist inks, and then fussy cut.


The flowers were adhered using both foam strips and dimensionals as I wanted to achieve a layered look. I thought about adding some gold metallic Twine - but that stuff and I don't get on too well so I canned that idea.  I didn't like the look of any jewels/sequins/rhinestones so I just left it as is.

The card is now in the post making its way to New Zealand - due to the layering, I put my overseas cards in a cello bag first, then the envelope. This helps keep everything attached as the card passes through the postal machines, and also prevents damage if the card is left in a wet letterbox (trust me, twice now, this has happened and both times the envelope was ruined but the card was perfect thanks to the cello bag!)

With loads of family and friends celebrating special occasions in June, I have a busy few days ahead in the craft studio - Yay!!! Hope you get time for you today and get to do something you enjoy, or even try something outside your comfort zone like entering a challenge - until next time - stay crafty x


Sunday, 16 April 2017

Fresh Florals DSP

Good Day Crafty Friends, thanks for popping by,

The new Stampin'Up Annual Catalogue and its beautiful array of DSP will be available 1st June 2017.  There are so many stunning DSP packs with coordinating ribbons, embellishments and lots of new and exciting additions to Stampin'Up's range, I want it all!!!

A BBB (Big Brown Box) arrived yesterday and in it were my items that I was able to pre-order. It contained the new in colour 2017-2018 ink pads, card stock and the coordinating Fresh Florals DSP.


I have used a piece of new Fresh Floral's DSP in Powder Pink. The Flower image and sentiment is from the Birthday Blooms stamp set and the little flower stamped in Versamark on the Powder Pink card stock is from the Jar of Love bundle.
 
The next card uses the flip side of this DSP


Again using the Birthday Blooms flower image but this time heat embossed in gold. I used Powder Pink, Emerald Envy and Old Olive with an Aqua Painter to colour the flower. The sentiment Tickled Pink for you is from the new Fabulous Flamingo stamp set - also available 1 June 2017.
 
I will be sharing cards made with this DSP in all the new In Colours, so four more colours to go!
 
Thanks for visiting, hope you have a crafty day xx


Wednesday, 12 April 2017

Birthday Delivery Stamp Set - Onstage Perth

Good Day Crafty Friends

Today I would like to share a very quick and easy card I made because I needed to crack open a stamp set I won at SU Perth On Stage.
 
The stamp set is called Birthday Delivery and is part of an amazing bundle which includes Framelits that cut the stamped images but also images on the gorgeous DSP.  

My amazingly talented upline Sarah Klass presented the Birthday Deliveries suite on the day and her creations were stunning! She used the Framelits and DSP to cut toppers for Cupcakes, showed a jaw dropping banner for Birthday Party decorations, and loads of ideas for cards and other party décor.


I have used Whisper White, Pink Pirouette and Sahara Sand Cardstock with the Hexagons TIEF and a Doily. I quickly stitched the outside of the Sahara Sand layer with the trusty sewing machine. The girl image was stamped in Archival Black on Shimmery White card stock and water coloured using an aqua painter and Pink Pirouette ink. I fussy cut the image and adhered her to the oval splattered piece with foam strips with the sentiment from Birthday Blooms. 

I have a few ideas for cards using the other images in the stamp set and can't wait to get the matching Framelits and coordinating DSP. Till next time xx