SOCIAL MEDIA

Tuesday, 5 June 2018

Painted Glass Stamp Set - Pretty in Pink

Hello Crafty Friends,

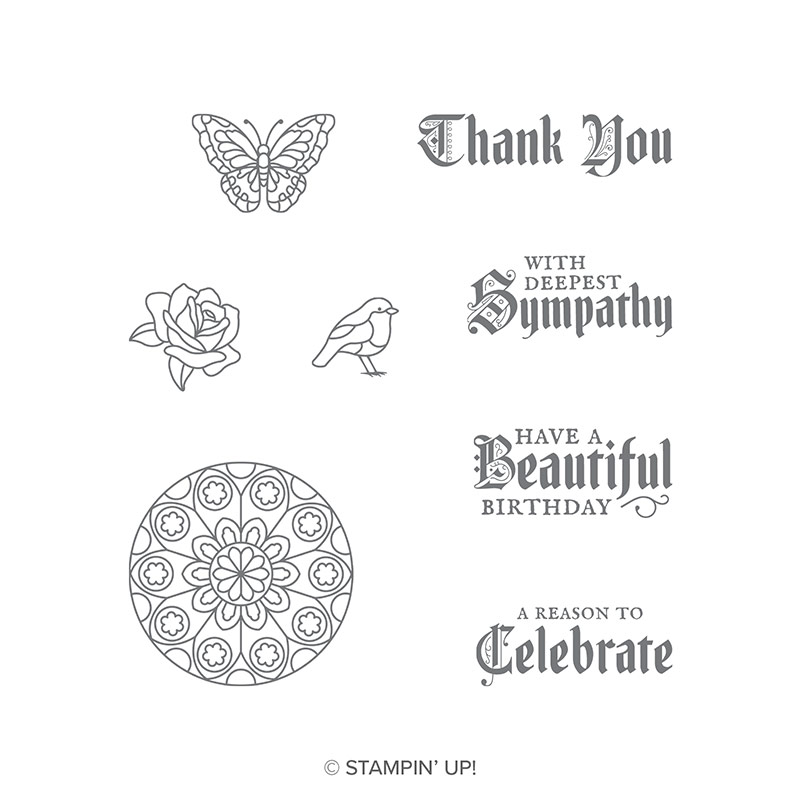
Just a quick post today to share a few cards made with the stunning new Painted Glass Stamp Set. There are four sentiments and four images and has coordinating dies - Stained Glass Thinlits.
Painted Glass Clear-Mount Stamp Set

 I have combined the stamped images with a few different coloured and size stitched frames, created using the Stitched Shapes framelits - by extending different sized Square Stitched Shaped framelits.

Painted Glass Stamp Set

The rose and butterfly images have been stamped using Momento Tuxedo Ink and coloured using Stampin' Blends. The foliage behind the roses are fussy cut images from the Jar of Love stamp set.

Bakers Twine has been split and placed behind the roses along with some Powder Pink ribbon. The Celebrate You Thinlits were used to die cut the 'amazing' from Silver Foil. A few Artisan Pearls were added to finish the card.

Painted Glass Butterfly Roses

The next card was created using the Butterfly stamp and masking technique. The images were stamped using Momento Tuxedo ink and coloured using Stampin' Blends. Splatters of black ink were applied along with the fussy cut sentiment from Rooted in Nature stamp set. 

The card front was cut down, a layer of black card added to the right hand side before adhering to card base with a strip of Lovely Lipstick In Colour DSP. A few Black Faceted Dots were added and voila the card is complete.

Painted Glass Stamp Set

Page 164 of the Annual Catalogue shows samples using both The Painted Glass Bundle and Graceful Glass Suite - be sure to check it out for loads of inspiration using these stunning items.

Graceful Glass

Until next time, stay crafty


Thursday, 3 May 2018

Painted Glass with Bokeh Background

Good Day Crafty Friends,
Hope you are having a swell day. Its a gorgeous day here in my neck of the woods, although the temperature is just starting to shift, I cannot complain as its been a very mild Autumn. Fingers crossed the same applies to our Winter.
I wont take up much of your time, just wanted to share a recent make using the large image stamp from the Painted Glass set.

painted glass stamp set, bokeh technique, stampin up

I created a Bokeh background and then white embossed the circular image. To tone down the extremely vibrant background, I added a strip of vellum before adhering the cluster of elements in the right hand corner. I don't know what it is, but I always gravitate to that corner.
Do you complete the make and takes at Onstage on the day? I don't lol I stamp the required pieces and drag everything else home and recycle it!! I know, I am such a miser lol.
I have used the strip of Share What you Love Speciality DSP and new 1/4" Rich Razzleberry Velvet Ribbon, from one of the make and takes to create this card. A stitched rectangle was added as a base for the cluster, created by extending the square Framelits. Also, a strip of Gold Foil, a Butterfly die cut and then the stamped butterfly image, also from Painted Glass.
I wanted to add some Gold Metallic Thread but couldn't find it! I know I pulled it out to thread some onto a bobbin and then well....I just don't know! It will show up.

bokeh technique, painted glass stamp set

Creating Bokeh Backgrounds

I always use Shimmery White Card Stock when using any sponging techniques.
Create a stencil with half a sheet of Acetate, using different sized circular shapes. I used both punches and die cuts.
Start by sponging your base colours, in circular motions - always circular. Start off the card on scratch paper and work your way onto the card stock. This prevents ink build up and noticeable sponge marks. Always build colour, meaning, start off light and add layers of colour. Never go in expecting the ink pad colour to be transposed onto the card with just one coating. It takes many layers.
Once you are satisfied with your background, let it dry. I tend to leave them overnight. If you don't wait, you will need a few sponges for the next stage, as the ink can transfer onto yours sponges. Take your stencil and sponge White Craft Ink. Alternate the circles and layers of white ink used. Be random and don't be afraid to overlap.
Hope you are inspired to give it a try.
Until next time, stay crafty


Wednesday, 18 April 2018

Display Board Stamper Blog Hop - Sea of Textures, Lilypad Lake, Painted Glass

Hello Crafty Friends,

Welcome to the Onstage April 2018 Presenter & Display Board Showcase Blog Hop. Thanks for joining us.


You are currently visiting Jackie Aitken in Western Australia.  If you are following the hop, you may have arrived here from talented, Kim Oliver. There are quite a few Demonstrators from all over the globe participating in this hop, so be sure to hop all the way through, for loads of inspiration using some of the new products from the new Annual Catalogue.

I was lucky enough to be a Display Board Stamper at my second ever Onstage, in Perth, Western Australia. I was so nervous I couldn't hang my samples, so my wonderful Upline, Sarah Klass, stepped in and hung them for me while I received Check In training. Below is a picture of my Display Board.


My generous box of goodies contained three stamp sets: Sea of Textures, Painted Glass and Lilypad Lake. The new Subtle Embossing Folder and the Lovely Label punch were in there too. I also received the new in colour DSP and matching embellishments, which was so exciting to see, but so hard to keep the excitement to yourself lol.
Below are the samples I created for my Display Board. WARNING: Lots of photographs to follow, so I will keep the chit chat to a minimum.
SEA OF TEXTURES STAMP SET

Sampler - Netting made with Linen Thread
sea of textures, stampin up, sampler

Fancy Fold - Shadow Box Card with Acetate Window. On opening and closing the sailing boats move.
stampin up sea of textures, waterfront, fancy fold, shadow box acetate window

Shaker card with a sponged card front.
sea of textures, stampin up, shaker card, rainbow sponging

Shaker Card, sponged background, silver heat embossed images and White Sand.
sea of textures, stampin up, shaker card, vellum and heat embossing

Another Shaker Card - the new adhesive backed sequins are stunning.
sea of textures, rainbow sponging, stampin up, shaker card

Stamped background, sponged side panel with vellum "bubbles".
sea of textures, stampin up, octopus card

Two Original Fancy Folds Designs - Shadow Box Card & Aquarium Box Card.
stampin up, waterfront, sea of textures, fancy fold, window cards, aquarium card

LILYPAD LAKE STAMP SET

Another Shadow Box card with acetate window. Sponged background and reverse stamped images.
lilypad lake, stampin up, shadow box card, fancy fold, sponging technique

Sponged panel with stamped images coloured using Stampin' Blends.
lilypad lake, stampin up, sponging technique

The sailing boats are so cute, I had to make a nautical themed card, complete with a life buoy.
lilypad lake, stampin up, nautical card, blueberry bushel dsp


PAINTED GLASS STAMP SET


A 12 x 12 Scrapbook Page Layout

Again, some white heat embossed images that have been water coloured. The butterfly has been fussy cut and adhered with mini dimensionals.
painted glass stamp set, stampin up, roses and butterfly cards, watercolour
The roses on this card are also white heat embossed, on Vellum. Colour has been applied to the back with Stampin Blends.
painted glass, stampin up, roses, coloured vellum, stampin up

Also in my box was the Lovely Label Punch. I have sponged a piece of Shimmery White card stock, used a portion to create the panel on the left and the remainder, was punched and used as a base for the roses.
painted glass, stampin up

Another Shadow Box Card with the Gold Foil exterior embossed using the new Subtle Embossing Folder. The Medallion image has been Gold heat embossed and portions of the stamped image, fussy cut and layered.
painted gkass, stampin up, subtle embossing folder, shadow box card

For those that are familiar with my work, will know I struggle to use DSP. I tried incorporating the stunning In Colour DSP pack I received with the cards I was creating, but it just wasn't working.  Then, I had a light bulb moment. I love making Pocket Cards, so what better way to show the DSP.
The next few creations feature the new In Colour DSP Pack & Binder Clips along with products that are carrying over into the new Catalogue.

Pineapple Punch
stampin up, pineapple punch, pocket card, cake soiree
inside
stampin up, pineapple punch, pocket card, jar of love, cake soiree
Lovely Lipstick
stampin up, lovely lipstick dsp, pocket card
inside
stampin up, lovely lipstick, pocket card
Call Me Clover
pocket card, call me clover dsp, berry burst. stampin up
inside
stampin up, call me clover, celebrate you thinlits, berry burst, pocket card

That's it folks!! I can hear you sighing lol I know - I'm a sharer!

Next up in the blog hop is my lovely and talented friend, Nicole Wilson. I was lucky enough to share the board with Nicole, so can vouch for how stunning her creations are in real life. Enjoy xx

 https://nicolejuliewilson.blogspot.com/2018/04/onstage-april-2018-presentation-display.html

Thank You so much for hopping with us today, your time to view our projects is greatly appreciated.


Interested in some of the Fancy Fold cards featured in today's post? Tutorials are available!! Just click on the image below to be taken to the AddINKtive Designs Tutorial Shop.