SOCIAL MEDIA

Thursday, 26 October 2017

Just Add Ink #383 - Cake!!!

Hello crafty friends,

Hope your day is going well. The teen kindly reminded me today, that it was only 2 months until Christmas! Seriously?! How did that happen? My Mum is flying over from NZ for the first time in five years, to spend Christmas with us. I had planned to make so many decorations - so far, I've completed nudda - nought - nil!! I have at least started some Christmas shopping (the part I dislike the most) and not wrapped a thing (normally, the thing I enjoy the most about Christmas) Fingers crossed as we move into November, I will embrace the Chrissy spirit and smash out all my planned creations.

https://just-add-ink.blogspot.com/2017/10/just-add-ink-383just-add-cake.html

Its challenge time over at Just Add Ink. This week, Chloe has asked that we Just Add Cake. Yep CAKE!! Such a fun theme! Who doesn't love cake. And oh my....you have got to see all the fabulous creations the JAI Design Team have shared. Browsing through the gallery made me hungry for CAAAKKKKKEEEE!!!!!

As usual I made two cards for this challenge....well, actually I made three but the third got binned due to it resembling something a cat would vomit up!
 
Both cards use a stamp set that came with a craft magazine. I cannot recall the publication, as I biffed it soon after. Should have thrown the stamps too, they are poor quality but I just adore the food cart!!
 
The first card has an embossing paste brick wall background. The chef, cart and cakes were coloured using my new Stampin' Up! Blends. The chef is from the Birthday Delivery set and the birthday sentiment from the At Home with You stamp set.

 
This card has used the same freebie set, stamped multiple times on two lines, to replicate a cake shop window. The Powder Pink awning was created using the scalloped edge die from the Colourful Seasons bundle. Again the images were coloured using my new alcohol Blends. For something different I stamped the sentiment multiple times and adhered with mini dimensionals across the front panel.
 
For more amazing cake inspiration, check the fun, almost edible and adorable DT creations here. Until next time, stay awesome
 
Thursday, 31 August 2017

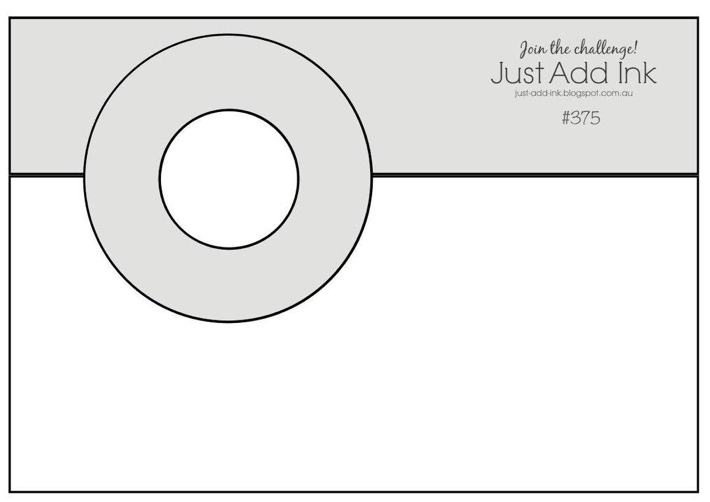
Just Add Ink #375 - Sketch


Hello Crafty Friends,

Hope your Friday is treating you well. It's challenge time over at Just Add Ink and Kim has challenged us with a sketch.  I loved the simplicity of this sketch,  I decided to rotate the orientation, to create two tent fold cards.

http://just-add-ink.blogspot.com/2017/09/just-add-ink-375sketch.html

The first card has a glossy white card front. Using a stencil from the Party Pattern Decorative Masks, I sponged Black Momento Ink, lighting the saturation gradually towards the centre. Then I removed the mask and lightly sponged Flirty Flamingo and Daffodil Delight inks.


The card front was adhered to a layer of black card before adhering to the Flirty Flamingo card base. A vellum circle was cut using the Stitched Shapes and glued to the card front with a dab of Tombow.

The sentiment from Birthday Delivery was white heat embossed on black card and a layer of silver glimmer card was attached to the bottom.  The flower and leaves were die cut using the Eclectic Layers Thinlits and adhered to the vellum circle.


The inside of the flower is also glossy card with Flirty Flamingo & Melon Mambo inks applied with an aqua painter.
 
The second card uses the large flower and a leaf from the Falling Flowers stamp set. I stamped the images in Archival Black onto Shimmery White card and water coloured with Powder Pink, Blushing Bride, Wild Wasabi and Daffodil Delight. The centre image was stamped first and then masked and repeated to create the panel in the sketch.
 

I used the Circle Stitched Shapes to cut the two circles and raised with dimensionals for the outside ring and foam strip for the inside ring. The sentiment from Teeny Tiny Sentiments, was white heat embossed on black card and punched using the window word punch (now retired)


As always, the amazing Design Team have created and shared some stunning projects using this weeks challenge sketch, be sure to check them out here. Why not join us and play along.

Until next time, stay awesome
 
Wednesday, 9 August 2017

Ombré Sponging & Embossing

Hello Crafty Friends,
 
A quick post to share a set of cards using both dry and heat embossing and some sponging. I tried to achieve an ombre look and thought the colours blended well. Both cards have had the same treatment applied, the colours and stamp sets are different.
 
The card fronts are made starting with Shimmery White card as I find this allows for the best blending when using Stampin'Up! sponges. I start by sponging the two colours on the outer edges and then the middle colour. I have used Daffodil Delight, Lemon Lime Twist and Bermuda Bay inks for the card on the left. Daffodil Delight, Flirty Flamingo and Melon Mambo inks were used for the card on the right.


Next cut the two panels and run the smaller of the two through the big shot with an embossing folder - I have used the Sweetheart EF.
 
Ensure the sponged inks are dry before attempting the heat embossing. Also use your embossing buddy quite heavily as you likely touched the card while sponging. Next,  I have simply stamped the panel randomly with versamark before applying white embossing powder and heat setting. I did the sentiment first and worked the stamps around the free space.
 
Trim and adhere to a Thick Whisper White card base and its done. Super bright and fun.

Until next time, stay awesome

 
Thursday, 3 August 2017

JAI #371 Bella & Friends with Pretty Kitty Fancy Fold


Hello Crafty Friends,
Hope you are having a fabulous day.   I am super excited to share today's post, as the card I have created is for the Just Add Ink Challenge Blog, as a Guest Designer!!! 

To say I was ecstatic when asked to join the Design Team for August & September is an understatement. I danced around the lounge, then quickly questioned if there had been some kind of mistake, and I had received the invitation in error.?!? Could this be right?!? You see, the Design Team are a phenomenal group of creators, chokka block full with many of my Stampin'Up! Idols. 

I am one of five Guest Designers, joined by the extremely talented Lou Kitzleman, Jo Stubbings, Rachael Lewsley and Denita Wright-Smee. 

This weeks challenge at Just Add Ink is "Just Choose Two". I chose Pets and Patterned Paper.

http://just-add-ink.blogspot.com/2017/08/just-add-ink-371just-choose-two.html
Admittedly I am not a big user of DSP, and thought this was definitely going to be a challenge for me. I didn't struggle as much as I thought I would as soon as I decided to use dotti paper. In fact, I ended up creating two cards and couldn't decide which one to submit!

stampin up bella and friends stamp set, bookcase builder, Pretty Kitty, Fancy Fold Card, birthday delivery
I procrastinated for over a week, finally deciding on the Double Z Fold Card.  The staircase card was inspired by Amanda Bates - The Craft Spa. Amanda's work is ah-mazing! Check out Amanda's card that provided my inspiration here. 

I have used images from the following stamp sets - Pretty Kitty, Bookcase Builder, Bella & Friends (birds), Glamper Greetings (string of party lights) and Happy Birthday Gorgeous (party hats). Both sentiments stamps are from the Birthday Delivery stamp set.  All images were stamped in Archival Black and coloured using Stampin'Up! Water Colour Pencils.

Some retired DSP was used for the wallpaper and to provide the view looking out the window.   I also used a teeny bit for the backing of the picture framed Antlers. I had to put lights on the Antlers! All images were fussy cut except the window and shelf which were Die cut using the Hearth & Home Thinlits.

Some fine tip glue was added to the party hats and parrot on the shelf, and a few rhinestones to the flowers in the pot and the all the Kitty's collars.


stampin up fancy fold, pretty kitty, bella and friends, bookcase builder, hearth and home framelits

This is the card completely open and flat
stampin up fancy fold, staircase, pretty kitty, bella and friends, bookcase builder
And this is how it looks folded up ready to post.

stampin up fancy fold, staircase, pretty kitty, bella and friends, bookcase builder

Check out the Just Add Ink challenge blog to see all the amazing cards the Design Team have created. Why not join us by playing along with the challenge, its super easy, helps gets the creative juices flowing and you may even meet some lovely crafters out there in the blogisphere - I have and continue to do so everyday!

Until next time, stay crafty


Tuesday, 1 August 2017

Joy of Sets #003 - Letter C Challenge - In The City


Hello Crafty Friends, 
 
Hope you are having an enjoyable day. Its challenge time again over at Joy of Sets Blog Challenge. This fortnight's theme is the letter C. Use any current or retired Stampin' Up! stamp set that has the letter C in its title. eg Climbing Orchid, Fairy Celebration.


https://joyofsetschallenge.blogspot.com/…/jos003-letter-c.h…


For my card I chose to use the new Hostess set - In The City. I adore all the cute images, they are a two part stamp with an outline and fill in stamp. I have coloured mine using water colour pencils.


There are a few different types of houses, a few city buildings, a church, a variety of vehicles, trees, a plane, fireworks, a stork, ice cream palour and cart. The sentiments include a very cool "going to the chapel", "welcome to our block', "hope its a great day in your neighbourhood" and "neighborhood for our American friends.


I love the Happy Birthday sentiment from the Birthday Delivery stamp set. I thought the plane could leave the trail of Happy Birthday in the sky. 


I have used a Sahara Sand card base to which I heat embossed the sentiment in white embossing powder, ensuring to leave enough room for the plane.  Images were inked in Archival Black and stamped onto Shimmery White card and then coloured using Stampin'Up! Water Colour Pencils. The coloured images were fussy cut and adhered with tombow and dimensionals.


It's not very often I pull a stamp set from the shelf and only make one card. While I had everything out I made the other card, partially stamping onto a die cut oval and adding some Powder Pink ribbon.

Never participated in a blog challenge before? Why not join us at Joy of Sets Blog Challenge,  come and play along, we love to share what we do and I am sure you do to.

Until next time, stay awesome


Monday, 17 July 2017

Just Add Ink Challenge #368

Good Day Crafty Friends,

Hope yours has been an enjoyable one.  It's a gorgeous winter day here in my part of Western Australia. The sun is shining, the washing is drying and being the last day of the school holidays, I have the day off to tinker away in my crafty space.

One of the cards I made this morning may seem a little premature for this time of year - it's a Christmas card, and a non traditional one at that.


This weeks challenge over at Just Add Ink is to use a Birthday stamp set for Christmas.  Click on the link below to see the Design Team inspiring creations, or to join in and play along. 


http://just-add-ink.blogspot.com.au/2017/07/just-add-ink-368just-add-twist.html


I felt like stamping today, so using the Gift and Party Hat images from the Birthday Delivery stamp set, I stamped in a circular pattern using Archival Black ink, first with the wrapped gift then filling in the free space with the party hat.

The images had a little colour added using Lemon Lime Twist and Island Indigo inks. I have used Island Indigo card to make the square card base and backed the stamped circular image with Lemon Lime Twist.


The sentiment from a retired set called Merry Everything was inked in Archival Black and cut using the Layering Circles Framelits, with the Island Indigo layer behind cut in the next sized scalloped circle Framelit. The die cut sentiment was adhered using dimensionals.

A little Black and White Bakers Twine was wrapped around the card base, before adhering the card front to the base with dimensionals.

Yay for having started my Christmas Cards, albeit all of one! It will encourage me to make more so it is not sitting behind a tab that says "Family Christmas Cards" all by its lonesome.

Until next time, stay crafty


Wednesday, 10 May 2017

Fresh Florals DSP - Lemon Lime Twist

Welcome Crafty Friends,

Today I am sharing a set of cards using my new favourite in colour for 2017-2018 and the new Fresh Floral's DSP. The Lemon Lime Twist is just delish. Its so bright and clean, I can see myself using a lot of this colour in the future.


The card below uses Whisper White card stock and the flower thinlit from the Sunshine Wishes bundle. I die cut the flower and put that aside and used the remaining piece to stamp the sentiment on and then attach over the DSP using dimensionals.


I have stamped the sentiment from Birthday Delivery in Crumb Cake and tied a small bow using some neutral Bakers Twine. Each side of the card front has been lined with a 1" strip of DSP and then attached to a Sahara Sand card base.

The next card uses a sentiment from the Watercolour Words stamp set and has been kept simple with just a white and Lemon Lime Twist colour scheme.


Black and Lemon Lime Twist are amazing together! The contrast is striking. The card below showcases four strips of the different prints in the DSP pack. I then added topped a Doiley, and over that a black circle with the heart die from the Love Notes Bundle backed with some Lemon Lime Twist card stock to make it pop. The sentiment is from the soon to be released Birthday Delivery stamp set. I just love the banner - there are two sentiments in this set that fit the banner, so even better!!!


Cant wait to team Lemon Lime Twist with other colours in the SU Rainbow! Looking forward to sharing those with you soon.
 
Happy Crafting x
Wednesday, 19 April 2017

Fresh Florals DSP - Tranquil Tide

Hello Crafty Friends,
 
Today's set of cards feature more of the new Fresh Florals DSP. These cards are all made using the new 2017-2019 In Colour called Tranquil Tide. Its a deep, rich colour, which I think will be great for Masculine themed cards. All these cards are simple and easy to replicate in little amount of time.


I really wanted to highlight the new Tranquil Tide colour, so predominately used Whisper White and Black card stock with the Fresh Florals DSP.

First up is a card using the die from the Up & Away Thinlits.  The sentiment is from the soon to be released Birthday Delivery stamp set - available June 1st. I love the two different fonts in one greeting. I also adore bling on the Hot Air Balloon! Any excuse to use bling is a good one!


The next card has a Sahara Sand base, a layer of DSP and the sentiment from the Bookcase Builder Stamp Set was inked up in Sahara Sand before the panel was run through the Big Shot using the Hexagons Embossing folder. Little flower die cut in Tranquil Tide card stock had a bow of Bakers Twine added and then a pearl embellishment.


For the next card, layers of DSP and Tranquil Tide card stock were given a Whisper White matt. The Succulent was made using the Oh So Succulent Dies cut from Mint Macaroon card stock and sponged on the tips with Sweet SugarPlum. I tucked in the sentiment from Blooms & Wishes stamp set under the Succulent and attached with a dimensional.


Hope I have inspired you to get into your craft room and use some of your lovely DSP's. Enjoy your day x
Wednesday, 12 April 2017

Birthday Delivery Stamp Set - Onstage Perth

Good Day Crafty Friends

Today I would like to share a very quick and easy card I made because I needed to crack open a stamp set I won at SU Perth On Stage.
 
The stamp set is called Birthday Delivery and is part of an amazing bundle which includes Framelits that cut the stamped images but also images on the gorgeous DSP.  

My amazingly talented upline Sarah Klass presented the Birthday Deliveries suite on the day and her creations were stunning! She used the Framelits and DSP to cut toppers for Cupcakes, showed a jaw dropping banner for Birthday Party decorations, and loads of ideas for cards and other party décor.


I have used Whisper White, Pink Pirouette and Sahara Sand Cardstock with the Hexagons TIEF and a Doily. I quickly stitched the outside of the Sahara Sand layer with the trusty sewing machine. The girl image was stamped in Archival Black on Shimmery White card stock and water coloured using an aqua painter and Pink Pirouette ink. I fussy cut the image and adhered her to the oval splattered piece with foam strips with the sentiment from Birthday Blooms. 

I have a few ideas for cards using the other images in the stamp set and can't wait to get the matching Framelits and coordinating DSP. Till next time xx
 

Birthday Delivery Stamp Set - Chef Card

Hello Crafty Friends

I'm excited to share another very simple and easy to make card using the new Birthday Delivery stamp set. This amazingly versatile suite will be available through Stampin'Up and my shop in June but I was lucky enough to win this set at On Stage so get to play with it early.

stampin up birthday delivery stamp set, chef card, bakers card 

As you can see the French Chef is one of the fabulous images in this set as is the Happy Birthday sentiment he is squirting out of his icing tube. On a piece of black card stock I heat embossed the Happy Birthday in white embossing powder and adhered to a Whisper White card base. 

The black and white kitchen floor tiles are just white squares of Whisper White adhered to the Black card stock with Tombow. The chef was stamped on Whisper White and coloured using Real Red and Sahara Sand Markers. A quick wrap around and bow with Bakers Twine and card is done! 

I love the cheeky look of this chef and know a few chefs who I will be using this image to make cards for in the future.

Wishing you a crafty day, till next time