SOCIAL MEDIA

Thursday, 1 February 2018

Just Add Ink Challenge #394 - Just Add Romance

Image may contain: text
Good Day Crafty Friends,

Welcome, hope you are having a fabulous day. Its challenge time over at Just Add Ink. Yipeee!!! This weeks challenge is such fabulous timing for those making Valentine's Day cards - Just Add Romance.

Image may contain: text

I made a special card for my wonderful Hubby, Daniel. He is the more proficient chef/cook/baker in our household - emphasis on baker! He makes the most wonderful Chocolate Cake, Pavlova and Slices. So for his Valentines Day card I decided he needed a "Kitchen of Love" - really I just wanted to use my Apron of Love Bundle.......again. I just love this bundle.


As you can see the card has a simple 'pop up' base, with the kitchen counter being the main pop up component.  I added an extra layer to the pop up mechanism, behind the acetate window in the oven. Silver Foil card has been placed approx. 1cm behind the oven front - attached to the kitchen counter and card base "floor". To this I added 3 heat embossed cup cakes.

 
The oven has been made using the Heart and Home Framelits - cut down with the bottom ledge reattached. Acetate has been placed behind the die cut before attaching to the kitchen counter which had an opening made with a craft knife.
 

The cooktop has been created using Silver Foil card with various dies and punches - Owl Builder, Home Sweet Home, Stitched Shapes.

 
All sentiments have been white heat embossed as well as the cupcakes, oven glove and apron pocket with flowers (tucked under the banner with "made with love" sentiment.)
 
 
The card front is also a little special. Using the large letter Framelits to spell out LOVE, replacing the O with a die cut heart.  To make it that little bit extra special I made the heart with a small shaker element. Then in a banner, the sentiment from Petal Palette was stamped, fussy cut and placed over the heart.


The Design Team have created some stunning cards to inspire you to get crafty with a Romance theme. We would love for you to join us, you can play along by adding your creation to the JAI gallery here. I can’t wait to see all the amazing cards.

Until next time, stay awesome


Sunday, 28 January 2018

Magical Day Unicorn

Hello Crafty Friends,

Hope you are having a great day. Just a quick post today to share a card that made me giggle as I was creating it. Hope the recipient has a chuckle when she opens it.....she may not.  I filled it with loads of tiny punched hearts that probably fell all over her floor!! I can just picture her laughing and cursing simultaneously, as she cleans up the mess.

I just adore the Magical Day stamp set. The chubby Unicorn is simple and easy to colour as are the other images in the set - the mermaid, seahorse, knight, dragon and wizard.

I have shown the "clean" version of this card,  with a die cut YOU flipped around and the U cut down to form the J.
 
"May Unicorn's fart rainbow coloured sequins all over your day"


On a Whisper White card front I cut two lines using a stitched curved line die (not Stampin' Up!) but two simple cuts made with a trimmer will suffice. Place this over the card base and lightly mark with a pencil the space you want filled with sequins.

Stamp card front ( I used the tiny sparkles in Powder Pink, but they do not show up well in the photo), add White Glitter card die cut clouds and place the coloured and fussy cut Unicorn just over the opening of the two lines.

I lined the marked area with double sided adhesive, ensuring a small overlapped the pencil marks. Then I simply poured the irredescent sequins container on the adhesive and poured off the excess. I pressed the sequins flat and then poured them over again to fill the gaps.

Adhere the card front to the card base with Tombow. You could raise the front from the base with dimensionals but this one was being posted so I needed to reduce the bulk.

Until next time, stay crafty
Sunday, 21 January 2018

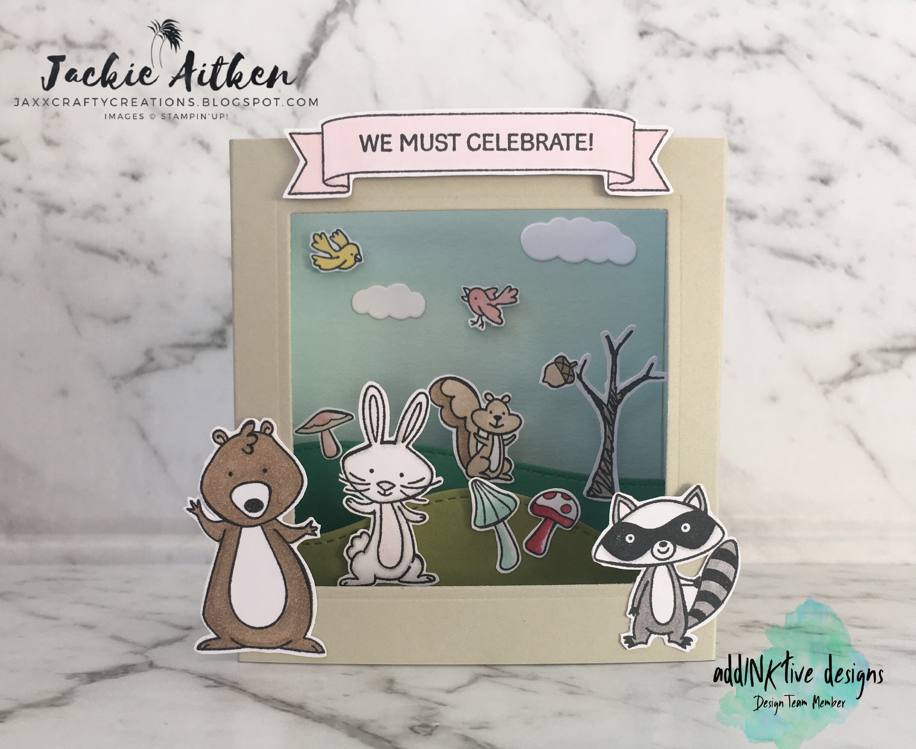
We Must Celebrate - Shadow Box Card

Hello Crafty Friends

Hope your having a great day. I am so excited to share today's post as I have been keeping this information to myself since December. For those who visit my blog regularly,  you would have noticed a new Design Team Member Badge added to my sidebar.
Todays card uses a tutorial by Bronwyn Eastley at AddINKtive Designs.  Every month I will be sharing a creation using one of Bronwyn's fabulous tutorials. Spoilt for choice, I finally decided to use the Shadow Box Card Tutorial. So much wow factor and the card folds flat for posting! Double Bonus. You can purchase this tutorial from Bronwyn, here.

stampin up, we must celebrate

I have created the Shadow Box with Sahara Sand card. I tried adding DSP to the outside but because I added so many elements to the inside, it became very busy so I have left the front and back plain. The inside back and sides have been lined with Pool Party card. Pear Pizzaz and Emerald Envy card were used for the grass tab inserts.
The Woodland Critters - Bear, Racoon, Rabbit and Squirrel are from the new We Must Celebrate stamp set. The sentiment, mushrooms and acorn are also part of this set. The cute birds are from the new Flying Home stamp set. All images were stamped in Black Momento ink, coloured using Stampin' Blends and then fussy cut.
The banner surrounding the sentiment is from the Number of Years set. I have used the Sprinkles of Life bundle to create the tree and the clouds were created using the Lift Me Up Bundle.
I absolutely adore this card style. The base is simple and fast to construct and uses only one sheet of A4 card. While I was decorating my card I had so many idea's for future cards using this impressive and fun fold.
I have already started on two other versions of the Shadow Box Card. I cannot wait to share them. You can view/purchase Bronwyn's amazing tutorials at AddINKtive Designs here. All projects come with detailed, easy to follow instructions and photographs.
Until next time, stay crafty


Monday, 10 April 2017

Convention Swaps

Hello Crafty Friends,

As mentioned in an earlier post, I made over 100 swaps for the Perth Onstage event. I did not make just one design lol. I made 7 because I knew everyone has different taste when it comes to colours etc. Here is one of the seven designs. I made 10 full cards as part of my swaps. This is the Poppin Box Card -box and wrap tutorial by Gemma Clarke.


And here is a picture of all angles of the box, wrap and belly band.


As you can see I used a few different bundles to decorate the box.  I took the colour inspiration from the DSP I was using so that it was easier to coordinate. I used the Cupcakes & Carousels DSP, Whisper White, Black, So Saffron and Bermuda Bay Cardstock with a few teeny bits of Vellum. I used Archival Black ink for most of the stamped images, with the addition of So Saffron and Bermuda Bay inks for colouring the hot air balloon, sponging the inside card, flowers in the jar etc.

I made five in each colour card base - So Saffron & Bermuda Bay and decorated with a piece of DSP that covered the front third of the card. 


To decorate the belly band, I cut strips of Cardstock and attached to the middle before using the Layering Circles Framelits to make 3 circles in white, So Saffron and Bermuda Bay before using a 4th circle to cut DSP from the Cupcakes & Carousels DSP Stack.

The For You sentiment is from the Jar of Love Bundle and was heat embossed in white powder on Bermuda Bay card stock.

I made the little tassels as I felt the fronts were a tad too plain. Using scraps of So Saffron and Bermuda Bay I ruled a small line down from the top edge of my strip of Cardstock and using scissors cut lines upto the pencil mark. 


Then just add a loop of Bakers Twine at the beginning of the strip of Cardstock and start rolling. I used Tombow to secure the Bakers Twine and to close up the rolled tassel. Let dry then attach a small thin strip of silver foil Cardstock around the top. 


I stamped the inside with two sentiments and the carousel image from the Carousel Birthday Stamp Set using archival black ink and then using sponges I lightly sponged So Saffron and Bermuda Bay ink.
 
Four sides of the box were decorated using the Layering Squares Framelits to cut perfect squares from the DSP. The Layering Circles Framelits were used to cut two of each colour in So Saffron & Bermuda Bay to place over the DSP before decorating further.


Each side has a different image/bundle used to decorate over the DSP and Layering Circle. This side uses the Beautiful You stamp set and the T Shirt Builder Bundle. The lady image was paper pieced using DSP from the same Paper Stack. Her hat was coloured using So Saffron Marker. Sentiment is from the Sprinkles of Life stamp set.  I also used the triple banner punch to make the little banner behind the Tee.


The Love Notes bundle was used for this side with the envelope cut in Vellum. The heart die was cut in black card stock and the note card was stamped in Bermuda Bay for the hearts and Archival Black for the Happy Birthday. The little sentiment is from the Sprinkles of Life stamp set.


Up & Away Bundle for this side. Images were stamped in Archival Black on Shimmery White cardstock and coloured in using an Aqua Painter with So Saffron and Bermuda Bay inks. I had to add a little white die cut cloud too just because lol


And the Jar of Love bundle on this side. I did die cut a piece of vellum and put it over the stamped jar image so it looked more like glassware. The sentiment is from the Blooms & Wishes stamp set, which was heat embossed in white powder onto black card stock.
 
If you received one at Onstage hope you liked it - I could only give away 9 of them as I forgot I had to pop one on the SU Swaps Display Board.
 
Saturday, 1 April 2017

Up and Away

Hello Crafty Friends,
 
Just a quick post today as I really wanted to share this funny card while I work away on my swaps. When I saw the card posted by SU demonstrator Terri Hawke on a SU Facebook page I knew I had to make one. Terri's card can be found on her blog stampersblock.wordpress.com. Below is my take on her creativity.


Using the Up and Away Framelits I cut two hot air balloons in Melon Mambo and backed them with whisper white card stock. I then chopped off the balloon basket and flipped the balloon upside down and using white ribbon made the bra straps and middle decorative bow.
 
I attached two pearls at the top of each strap for additional decoration before attaching the Sahara Sand card front to a layer of Melon Mambo. I decided it needed more white so added this to a whisper white card base. I stamped the sentiment in Melon Mambo on whisper white and adhered to a layer of Melon Mambo to match the card front.

Hope you make time to get into your crafty space and try something out of the ordinary with some of your current craft supplies.

Happy Crafting x
 
Saturday, 18 March 2017

Joseph's Coat Technique

Another one of my favourite sponging techniques that has such an awesome wow factor is the Joseph's Coat Technique.


It's not overly apparent to the non card maker how this effect is achieved as it just looks like black card stock with some coloured shapes attached. But as a card maker I find the process from start to finish is absolutely amazing.

If you haven't tried this technique you must give it a go at least once, it's not overly technical, its just sponging and heat Embossing. 

You start by randomly sponging an array of colours on white card stock. Then using CLEAR embossing powder heat emboss some images - I used the Balloons and Clouds from the Lift Me Up Stamp Set. 

At this stage it's difficult to see where you have embossed but when you are satisfied you have enough on your card front, take your Momento Ink Pad and apply it directly over the entire card (yes put ink pad flat on the card and smear or drag). Make sure you have scrap paper down as you will need to start off the card with ink pad flat down so you get the edges.  I glided it over a few times ensuring I got full coverage. Then take a rag or paper towel and rub the excess ink from the heat embossed images. Viola! 


For this card I used Daffodil Delight, Flirty Flamingo, Bermuda Bay and Peakaboo Peach for the sponging underneath. I also used a die cut balloon embossed in silver and the sentiment from the Bookcase Builder Stamp Set. As I made a bit of a boo-boo I chopped it off and then mounted this to a piece of Flirty Flamingo card stock before adhering to the Black Card Base.


This card I stepped up a tad and added another layering of heat Embossing - this time in white, so its double embossed. All I did was once I had finished the steps to complete the Joseph's Coat Technique was add the three sentiments from the Sealed with Love Bundle by heat embossing in white. 


I put a white card stock matt behind it and heat embossed the sentiment in white on the Black card base. 

Every time I do this technique I think gosh why have I not done this on such n such, this would look great with so n so stamp set, and away I go - may need to reink my Momento Ink Pad again soon lol

Hope my cards have inspired you to get into your craft my space and try the Joseph's Coat Technique or any technique you haven't attempted in a while. 

Happy Crafting xx
Friday, 3 March 2017

One Sheet Wonder Set of Cards 1-14

Good Day Crafty Friends,

As promised, here is the breakdown of the cards made from my One Sheet Wonder Post. If you missed this post you can find the details by clicking here.

one sheet wonder, set of cards, osw template, stampin up, sunshine wishes, beautiful you, bookcase builder, owl builder punch 

All products listed are available from the Stampin' Up! Annual 2017 & Occasions 2017 catalogues. 

DSP used is from the Falling in Love 12x12 pack. Black cardstock was used to matt every piece of DSP and cut all the Dies. White cards fronts with some backed in black. Black Archival Ink. Black & White Bakers Twine & Rhinestone jewels. 

one sheet wonder, set of cards, osw template, stampin up, sunshine wishes, beautiful you, bookcase builder, owl builder punch 

Card 1.
Avant Garden stamped direct onto DSP. Sentiment from Bookcase Builder.  Wood Embossing Folder on card front.  Rhinestone jewels.

 
Card 2.
Sentiment from Paisleys and Posies.  Die cut flower using Sunshine Wishes Thinlits. Black & White and White Bakers Twine.

 
Card 3.
Sentiment and Balloon die from Lift Me Up Bundle. Rhinestone jewels on balloon die.

 
Card 4.
Elephant image (minus the mouse) from the Love You Lots Hostess set stamped directly onto DSP. Balloon Bouquet punch for the two small balloons. Congrats die cut from Sunshine Wishes Thinlits. Bakers Twine. Rhinestone jewel.


Card 5.
Sentiment from  Watercolour Wings. Small butterfly die cut from Bold Butterfly. Framelits. Leaves from Avant Garden. Rhinestone jewel on Butterfly.

 
Card 6.
Beautiful You lady stamped directly onto DSP. Delicate Details lace stamp. Sentiment from Tin of Cards. Layering Ovals dies to cut out sentiment. Rhinestone jewel on her ring finger.

 
Card 7.
Love and flower die cut from Sunshine Wishes Thinlits, small sentiment from the So Very Much sale-a-bration set. Rhinestone jewels.

 
Card 8.
Heart dies cut from Sealed with Love Bundle & Sunshine Wishes Thinlits. Sentiment from Bookcase Builder. Rhinestone jewel.

 
Card 9.
Hello stamp is from Tin Of Cards, Sunshine die cut from Sunshine Wishes Thinlits and the little arrow is from the Love Notes Framelits (Sealed with Love Bundle) Rhinestone jewel for the "i" in Sunshine.

 
Card 10.
Sentiment from Water Colour Words and Owl Builder Punch to punch out Owl. Line of rhinestone jewels.

 
Card 11.
Avant Garden flower stamped onto white card front. Stamp an extra and fussy cut. Sentiment stamp from Avant Garden and Triple Banner Punch used for cutting flag. Delicate Details stamped directly on the DSP and Bakers Twine run down through the middle. Small die cut from Paisleys & Posies. Position everything and then adhere fussy cut flower (middle flower in pic - covers banner). White Bakers Twine.

 
Card 12.
Die cut flower and sentiment from Paisleys and Posies Bundle. Rhinestone jewels.

 
Card 13.
Delicate Details lace stamp directly onto DSP.  Small butterfly die cut from Bold Butterfly Framelits. Sentiment from Blooms & Wishes. Black & White Bakers Twine.

 
Card 14.
Avant Garden flower stamped directly onto DSP. Sentiment from Blooms and Wishes. Black and White Bakers Twine.  Die cut from Sunshine Wishes Thinlits.

Thanks for visiting. Hope I inspired you to get into your craftroom and craft up a batch of cards from a sheet of 12x12 DSP.

Happy Crafting