SOCIAL MEDIA

Thursday, 1 November 2018

Christmas Memories & More Cards with Santa's Workshop

Good Day Crafty Friends

I hope you are having a great day. I am stoked to be back in my craft room and blogging after a mini vacation and hosting house guests.

Can you believe its less than 8 weeks until Christmas!!! Ahhhghhhh. I thought I better start boosting my Christmas Card stash so I am not making Festive cards the week before they need to be posted. 

The quickest and simplest way to create a batch of cards for me was to use some of the Santa's Workshop Memories & More cards.
Stampin'Up!, Santa's Workshop Memories & More Card Pack, Christmas Cards, Christmas Elves, Jaxx Crafty Creations
This is the third batch of cards I have managed to create using this M&M card pack. They have loads of cute festive images to choose from and many of the smaller cards make great layers for card fronts.


Stampin'Up!, Santa's Workshop Memories & More Card Pack, Christmas Cards, Christmas Elves, Jaxx Crafty Creations

Card 1

Starting with a Coastal Cabana card base, two diagonal panels from the Santa's Workshop M&M cards has been layered over a piece of Whisper White card.  A Gift Tag has been created using the Scalloped Tag Punch and adhered with Tombow along with a die cut shape created from another M&M card and a thinlit from Floral Frames. 

The sentiment has been fussy cut from one of the larger cards in the pack and adhered with mini dimensionals. To finish the card some bakers twine was added to the Tag and Christmas Tree sticker from the Santa's Workshop Memories & More Card Pack.

Stampin'Up!, Santa's Workshop Memories & More Card Pack, Christmas Cards, Christmas Elves, Jaxx Crafty Creations


Card 2

This is basically just one of the large Memories & More cards cut down slightly and adhered to a Garden Green card base. The Merry Christmas sentiment and Santa Hat are both stickers but have been adhered with mini dimensionals.

Stampin'Up!, Santa's Workshop Memories & More Card Pack, Christmas Cards, Christmas Elves, Jaxx Crafty Creations


Be sure to check back again soon for the other creations made in this batch of Christmas cards using the Santa's Workshop Memories & More Card Pack.


Stampin'Up!, Santa's Workshop Memories & More Card Pack, Christmas Cards, Christmas Elves, Jaxx Crafty Creations
Have you started your Christmas Card stash yet.....or better yet, are you very organised and have already completed all your Festive creations?

Thanks for stopping by today, until next time, stay awesome and stay crafty


Sunday, 3 June 2018

ESAD 2018 Annual Catalogue Launch Blog Hop

Good Day Crafty Friends,

Welcome to the ESAD Catalogue Launch Blog Hop. You are currently visiting Jackie Aitken in Western Australia. If you are following the hop you may have arrived here having just visited Sharon Dalton. Be sure to hop all the way through for loads of inspiration as all the hoppers will be sharing creations made with lots of the new Annual Catalogue goodies.


Image may contain: text

I have four cards to share today, featuring the new Rooted in Nature Bundle and the Stitched All Around Bundle.

rooted in nature stamp set, stitched panels,

The first card has a soft subtle colour palette. The background has been stamped using the leaf images from Rooted In Nature and the "lovely" sentiment from Stitched All Around. A few stitched shapes and die cut leaves were added along with a Bakers Twine Bow and some Silver Metallic Thread.

Stitched All Around, Rooted In Nature stamp set

Again with a soft colour combination this time teamed with Sahara Sand. The background has been stamped using images from the Rooted in Nature Bundle. The Stitched All Around dies were used for the layering elements along with foliage from Rooted in Nature and the fussy cut sentiment.

Stampin Up Stitched All Around, Cake Soiree Stamp Set

Can you tell that the Stitched All Around bundle is my favourite. I love anything with stitched detailing and this bundle has so many different shaped elements. For this card, a strip of Pineapple Punch DSP has been added to the card front before adhering the Stitched Detailed Frame. A tag stamped with the sentiment has been hung from the raised stitched heart die cut.  The floral images have been created using stamped images from Cake Soiree and Petal Palette stamp sets, that have been "drawn" on with an ink pen.

Rooted In Nature Stampin Up, Negative Die Cut Card

My final card uses a piece of the new Glass Vellum DSP that has been coloured using stamping blends and tucked it behind the negative die cut of the tree framelit from the Rooted in Nature bundle. The sentiment has been cut into three and spread across the three trees. A layer of Flirty Flamingo card has been attached behind the Vellum DSP before adhering to the Black card base.

That's it for me today, enjoy the rest of the ESAD Annual Catalogue Launch Blog Hop.


Image may contain: text

Up next the Blog Hop is the lovely and super talented Rochelle Blok , I am sure you are in for a treat, enjoy x

No automatic alt text available.

Thank You to  Kelly Kent for organising this Blog Hop and for providing the participant list below. If you get lost at anytime along the Hop, this list will enable to get back on track.

Blog Hop Participant List 


Until next time, stay crafty


Thursday, 2 November 2017

Just Add Ink #384 - Inspiration

Hello Crafty Friends,

Hope you are having a great day. The warmer weather is finally on its way to Western Australia. I walked into my craft area this morning to find the sun had been beaming through my window, onto cards I had laid out the night before. The ends of all the card bases had begun to curl slightly. Time for the blinds to be permanently drawn!! Such a shame as its lovely working under the natural light, with the sunshine warming my back.

https://just-add-ink.blogspot.com/2017/11/just-add-ink-384inspiration.html
 
Its challenge time over at Just Add Ink, and this week, Jan has chosen a stunning inspiration picture for us to work with. I just adore all the blue tones, especially the centre of those amazing blooms. For my card I chose to use the vibrant colours in the picture - the blues, white and yellow.


The card starts with a Thick Whisper White card base. The next layer is WW card embossed with the Softly Falling EF. The layered panel has been created by extending the square stitched framelit and the square scalloped edge framelit to make rectangle layers.


The flower die cuts were created using the Eclectic Layers Thinlits - again extending the die so the stems were longer. Dapper Denim, Tempting Turquoise and a little Marina Mist inks were splattered onto some, others had a brush apply ink directly to the die cuts.
 
To incorporate the yellow from the challenge picture, the sentiment was white heat embossed onto So Saffron card and adhered to the card with mini dimensionals.


The Just Add Ink Design Team have created some gorgeous cards inspired by this weeks challenge picture, be sure to check them out. Inspired to play along? We would love for you to join us, you can add your creation to the JAI challenge gallery, here.
 
Until next time, stay crafty


Thursday, 26 October 2017

Just Add Ink #383 - Cake!!!

Hello crafty friends,

Hope your day is going well. The teen kindly reminded me today, that it was only 2 months until Christmas! Seriously?! How did that happen? My Mum is flying over from NZ for the first time in five years, to spend Christmas with us. I had planned to make so many decorations - so far, I've completed nudda - nought - nil!! I have at least started some Christmas shopping (the part I dislike the most) and not wrapped a thing (normally, the thing I enjoy the most about Christmas) Fingers crossed as we move into November, I will embrace the Chrissy spirit and smash out all my planned creations.

https://just-add-ink.blogspot.com/2017/10/just-add-ink-383just-add-cake.html

Its challenge time over at Just Add Ink. This week, Chloe has asked that we Just Add Cake. Yep CAKE!! Such a fun theme! Who doesn't love cake. And oh my....you have got to see all the fabulous creations the JAI Design Team have shared. Browsing through the gallery made me hungry for CAAAKKKKKEEEE!!!!!

As usual I made two cards for this challenge....well, actually I made three but the third got binned due to it resembling something a cat would vomit up!
 
Both cards use a stamp set that came with a craft magazine. I cannot recall the publication, as I biffed it soon after. Should have thrown the stamps too, they are poor quality but I just adore the food cart!!
 
The first card has an embossing paste brick wall background. The chef, cart and cakes were coloured using my new Stampin' Up! Blends. The chef is from the Birthday Delivery set and the birthday sentiment from the At Home with You stamp set.

 
This card has used the same freebie set, stamped multiple times on two lines, to replicate a cake shop window. The Powder Pink awning was created using the scalloped edge die from the Colourful Seasons bundle. Again the images were coloured using my new alcohol Blends. For something different I stamped the sentiment multiple times and adhered with mini dimensionals across the front panel.
 
For more amazing cake inspiration, check the fun, almost edible and adorable DT creations here. Until next time, stay awesome
 
Thursday, 19 October 2017

Just Add Ink #382 - Colour Challenge

Hello Crafty Friends

Hope your day is going well. It’s Friday!!! Wahoooo! Which means it’s challenge time at Just Add Ink! This week we have a colour challenge - Fresh Fig, Smoky Slate, Black & White. 

Now, I thought this was going to be an easy challenge but honestly, I struggled immensely. I think I just overthought it as I had an idea in my head, but couldn’t pull it together with any stamping so went with my safety net of die cuts and heat embossing. 

https://just-add-ink.blogspot.com/2017/10/just-add-ink-382colour.html

I must make a confession. I initially used the wrong grey. And here I was thinking yay I’m ahead of my schedule - took the photos for my blog post, just about ready to upload to the Design Teams album and dun dun dun...I noticed I used the wrong grey!!!! Gah! 

I was able to rescue some parts of the card without having to redo it. The layer on the card base couldn’t be rectified so just tell your eyes to tell your brain that’s it’s Smoky Slate not Basic Grey! 


The background has been embossed with the Sweetheart EF. The sentiments have been gold heat embossed and tucked in between a layer of Fresh Fig and White White Card. The stitched rectangle has been created using the largest square from the stitched shapes Framelits, by extending the die cut. 

A vellum circle was also cut using the stitche shaped Framelits. This was tucked behind the Lamppost which was created using the Christmas Lamppost Thinlits with Black and Gold Foil Card. 


The roses were created from Fresh Fig card using a Thinlit from the Paisley and Posies Bundle.  Slightly mist the die cut and roll the card into a flower shape, let dry then adhere tombow. The leaves were die cut in Smoky Slate Card from the same Thinlit set. 

The Design Team over at Just Add Ink have shared some absolutely beautiful creations using this weeks challenge colours - be sure to check them all out here.  We would love for you to join us and play along, create a card using the challenge colours and share it with us on the Just Add Ink.

Until next time, stay crafty


Tuesday, 26 September 2017

Joy of Sets #007 - Letter W

Good Day Crafty Friends,

Hope you are having a fabulous day and have managed to squeeze in some crafting time for yourself.  It's challenge time over at Joy Of Sets. This weeks challenge letter is "W".
https://joyofsetschallenge.blogspot.com.au/2017/09/jos007-letter-w.html

Not familiar with JOS blog challenges?  Fiona Whitehead runs a fabulous Facebook group page called Joy Of Sets. It's an inspiring group where Stampin' Up! Demonstrators and non Demonstrators share their creations using both retired and current Stampin' Up! Products.  You can also enter the monthly colour challenge just by submitting a picture of a card you have created using that's months chosen colour, directly to the FB group page - no blog needed.

Alongside the FB group page, Fiona has started a fortnightly blog challenge - Joy of Sets Challenge Blog. Each fortnight a different letter is chosen and participants are required to enter a card, which has the challenge letter in the stamp sets title eg this fortnight we are working with W - I chose to use Watercolour Wings. 


To a Thick Whisper White 5"x5" card base, I added a strip of Merry Little Christmas DSP. Then to a Whisper White card front that had been embossed with the Softly Falling Embossing Folder, a strip of black card was added behind the card front before attaching to the base.
Two layers of Whisper White card were used as the base for layered butterfly cluster - the top layer has splatters of Powder Pink ink, created using the gorgeous grunge stamp set. Bakers twine was wrapped around the top before adhering to the card front with dimensionals.


Using the Watercolour Wings stamp set, the butterfly was inked in Powder Pink and Momento black. Old Olive card was used to cut the leaves using the Botanicals Builder Thinlits. The frames behind the butterfly were created using the squares from the Stitched Shapes Framelits.


A few banners of card were tucked behind the butterfly cluster and sentiment, to tie the cards overall colour combination together. The sentiment from Floral Phrases was stamped in Old Olive to coordinate with the ribbon tucked under the sentiment. A few rhinestones were added to finish it off.
 
Hope you are inspired to play along. Pull out a current or retired stamp set that has the letter "w" in its title and share with us here. Thanks for stopping by today.
 

Until next time, stay awesome


Thursday, 14 September 2017

Global Design Project #104 - Case the Designer

Good Day Crafty Friends,

Hope you are having a fantastic day. Its been hectic crazy in my neck of the woods of late. With this being my daughters final year at high school we have been busy with Year 12 stuff like balls and graduation preparations.

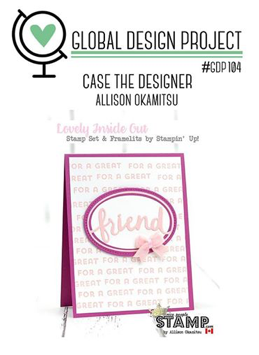
I have finally caught up on things (for now lol) and have had a chance to create a card to enter into this weeks Global Design Challenge!! Wahoooo! This weeks challenge is case the designer with a stunning creation by Allison Okamitsu.

http://www.global-design-project.com/2017/09/global-design-project-104-case-designer.html
 
I don't have the Lovely Inside and Out bundle...yet, it's on my list for October! So this required me to put my dazzling pink brainstorming hat on and think outside the square. I love the repetitive stamped background Allison has created so decided to start there. I used the sentiment from the hostess set In The City, inked in Powder Pink on whisper white card.


I also chose to give my card a similar layout to Allison's substituting the die cut word with a cheeky looking Toucan on a Swing! 
 
The Toucan and Floral images from the Good Vibes stamp set have been water coloured and fussy cut. The circle was cut using the Layering Circles Framelits. A panel of Whisper White card was sponged in Flirty Flamingo, Daffodil Delight and Tempting Turquoise, splattered with water using a paint brush and placed behind the card front cut out. 


I snipped the tips off the ends of a toothpick and secured some Black & White Bakers Twine for the swing.  A rhinestone jewel was added to the Toucan's head flower and a greeting from the Perfect Days Memories & More card pack was adhered with dimensionals.

EDITED 21/9/2017 - My card was selected as a Winner!!!
Wahoooooooooooooo!
 

Until next time, stay crafty


Tuesday, 12 September 2017

Joy of Sets #006 - Letter T

Hello Crafty Friends,

Hope your day is going well. Its challenge time again over at Joy of Sets, and this week we are using the Letter T as our inspiration.

I decided to use the Tranquil Tulips hostess stamp set. I adore Tulips and this set was one of the first to hit my wish list when I saw it at convention in April.


I started with a whisper white background and sponged some crumb cake ink through the Brick Wall stencil from the Pattern Party Decorative Masks set. The Tulips were stamped in Powder Pink, the other floral image from the Tranquil Tulip set was stamped in Bermuda Bay and then fussy cut.


The small flower from Jar of Love was stamped in Sweet Sugar Plum, die cut and adhered with mini dimensionals. Small dimantes were added to the centres. I also used two small flowers from the falling flowers stamp set. These were heat embossed in white powder and sponged in Powder Pink and Bermuda Bay.

A few strips of Old Olive card stock were cut for the foliage and added to the vellum jar.  Using the Jar of Love bundle, the jar was stamped in black Momento ink and then die cut. An additional vellum jar was cut and coloured from behind using a sponge and Bermuda Bay ink.


A Doily has been folded and added to the card front before adhering the Vellum Jar and Floral Arrangement. Pink bakers twine was wrapped around the jar's opening. The sentiment from Floral Phrases was stamped in Old Olive ink, curled slightly, then attached with dimensionals and some retired glimmer paper was tucked underneath.
 
Why not join us and play along with this weeks challenge. Find a stamp set that has the letter T in its title and create a card. Don't forget to share it with us at Joy of Sets Challenge Blog
 
Image may contain: text
Until next time, stay crafty


Tuesday, 29 August 2017

Joy of Sets #005 - Letter J


Hello Crafty Friends

Its challenge time over at Joy of Sets. For this fortnights challenge we are using the Letter J. Pull out a stamp set , current or retired, with the letter J in its Title and play along with us.

https://joyofsetschallenge.blogspot.com.au/2017/08/jos-005-letter-j.html

I chose to make a Piano themed card using the Jar of Love stamp set, minus the Jar. I love the flowers in the Jar of Love bundle, they are my go to for any small floral images that don't require colouring or fussy cutting.  Do you have musician friends? If so these cards are perfect. They are relatively easy to make and also a great way to showcase the new Music Script background stamp.


The Piano card uses the Floral images from Jar of Love and Tranquil Tulips. I wanted a pink toned Floral arrangement laying across the top of Piano. I also wanted my lid to open leaving the keys on what is the inside of the card.


This type of card is made using one full sheet of A4 card. I scored the long side at 10.5cm and the short side at 14.85cm. Then cut away one square or essentially what is one card front from a sheet of A4.


Next I folded it into place and cut a curved edged to the card front. This should open sideways to reveal the music sheet underneath. Then u lift the music sheet (tent fold) to reveal the card inner and keyboard.
 
The sentiments from Colourful Seasons were heat embossed in White on the front and stamped in Black Momento on the inside. The keys have been made using the Window Words punch (now retired)
 

The Guitar is very basic and easy to make.  Using Layering Circles to make the cuts in the card front and the border around the outside. 

I have stamped the Music Sheet Background Stamp onto whisper white and adhered behind the cutout with tombow. The strings are metallic gold thread. The bottom bar was made using the retired window words punch. The sentiment from Pocketful of Sunshine was heat embossed in white on black card and adhered with dimensionals.

 
The Joy of Sets Design Team have created some inspirational cards, using retired and current stamp sets, why not pull out a stamp set with the letter J in its title and come play along with us.

Until next time, stay crafty & awesome